About
I'm an operations leader who designs to simplify complex data and processes. My favorite work exists at the intersection of strategy and technology, where thoughtful design and robust engineering solve real-world problems in education, public service, and civic engagement.
I'm currently building Polibased, a platform that democratizes political data. I'm leveraging my experience managing multi-million dollar budgets and streamlining operations to architect this tool with automation and user-focused design.
I've led finance and operations in higher education, nonprofits, and corporate environments alongside cross-functional and international teams. These experiences sharpened my ability to balance operational detail with a clear strategic vision.
Outside of work, you'll find me exploring new hiking trails, learning about the latest cloud and tech trends, and discovering local used bookstores.
Location
Raleigh, NC
Current Focus
AI & Python
Goal
Coherent Systems
Experience
2025–Present
Building an AI‑powered political intelligence platform that democratizes access to legislative data and civic insights. Designed and prototyped the architecture using Python, Supabase and GPT‑based agents. Leading product strategy, research, branding and UI/UX inspired by Bloomberg Terminal, RealClearPolitics and GitHub. The platform is currently in Alpha-Stage, preparing for MVP launch and business plan for startup accelerators and a public beta.
2021–2025
Spearheaded financial management for $2.5M+ in funds, delivering actionable reports to C-suite leadership and elected officials. Co-founded and led cross-functional team to deliver 1000+ live programs in 40 U.S. states, reaching 140K+ participants. Self-taught and launched website, implemented online ticketing solution, and drafted SOPs using SharePoint, Slack, Excel, and Eventbrite, saving $100K+ in operational and design costs.
2018–2021
Managed a $260K annual budget supporting multiple academic programs while ensuring strict procurement compliance. Coordinated cross‑departmental operations—from student hiring and vendor registration to procurement and office logistics. Partnered with faculty and IT staff to launch a first‑of‑its‑kind makerspace featuring 3D printing, Arduino programming, laser engraving and CAD‑style design tools, giving students hands‑on exposure to emerging technologies.
2017–2018
Worked in twelve month internship (six months in Paris, France) under a VP at this leading European IT services firm. Supported HR areas including mobility, workforce planning, performance, and recruiting. Prepared KPIs, organized 20+ webinars for 3,000+ employees, improved internal job postings, and drafted internal HR FAQs.
2016
Conducted field research in Hanoi and Ho Chi Minh City, Vietnam. Interviewed executives, U.S. embassy staff and local manufacturing facility leaders to provide export‑market policy recommendations to the State of South Carolina. Received commendation for actionable policy insights.
Projects
Pursuing Microsoft Azure AI Engineer Associate (AI-102) certification to deepen expertise in Azure Cognitive Services, machine learning solutions, and AI application development. Documenting learning journey and practical implementations.
Building an AI-powered platform (currently in Alpha stage) to make real-time legislative data and civic insights accessible to all. Developing tools to track votes, analyze policy trends, and visualize government activity using open data and large language models.
Full-stack website development, launch, and hosting for the Anne Frank Center. Built a comprehensive digital platform to support the organization's mission and programs across 40+ U.S. states.
A modern, responsive personal portfolio website showcasing my journey from operations leadership to AI systems development. Built with Next.js, TypeScript, and Tailwind CSS with smooth navigation, hover effects, and optimized performance.
Certs + Education
Ecole Superieure de Commerce de Paris - Business School
University of South Carolina, Darla Moore Business School
Bachelors in Political Science
University of South Carolina, Honors College
Learning
Skills & Technologies Covered
Azure AI Platform
AI & Machine Learning
Natural Language & Vision
Development & Implementation
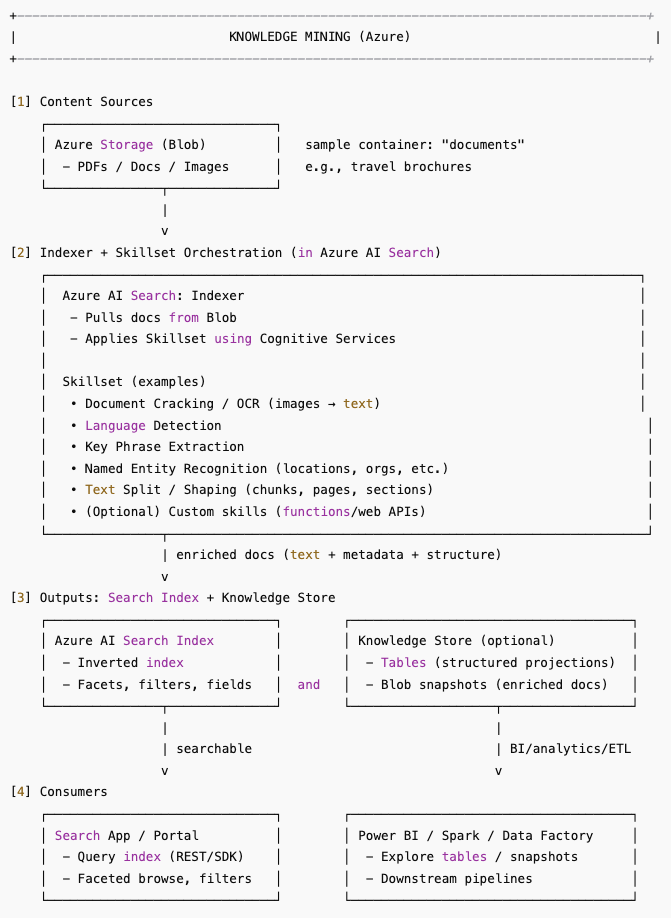
Build a Knowledge Mining Solution with Azure AI Search
Implemented a Knowledge Mining pipeline for unstructured content (brochures) using Azure AI Search + Azure Storage. Ingested raw files, applied an AI skillset (OCR, key phrases, entities, language detection), and produced an indexed, faceted search experience with optional outputs to a Knowledge Store for BI/ETL.
🛠️ Process
- Provision Services: Created Azure AI Search (Free tier) and an Azure Storage account (Blob).
- Load Content: Uploaded sample brochures to a
documentscontainer in Blob Storage. - Define Skillset: Added built-in skills for OCR, language detection, key phrase extraction, and named entity recognition (locations, orgs, etc.).
- Indexing Pipeline: Configured a data source, index, and indexer to enrich and project fields (content, metadata, entities, keyPhrases).
- Knowledge Store (Optional): Persisted enriched projections to tables/blobs for downstream analytics and reporting.
- Explore & Query: Queried the index via portal/search UI to validate facets, filters, and relevance across the enriched documents.
🧩 Practical Use
Converts scattered PDFs/images into a searchable knowledge base. Common scenarios: enterprise search, contract/brochure discovery, customer support knowledge, and compliance review—plus analytics via the Knowledge Store (Power BI, Spark, Data Factory).
📎 Difficulty Encountered
Minimal—main gotchas were ensuring the container name matches the data source and mapping enriched fields to the index schema correctly.
⏱ Time Required
~45 minutes.
📌 Key Takeaway
AI-enriched indexing (skills + search) turns unstructured files into structured, discoverable knowledge—with the option to persist projections for analytics. It’s a reusable pattern for any doc-heavy workflow.
📝 Wireframe from ChatGPT explaining process
Analyze Forms with Custom Azure AI Document Intelligence Models
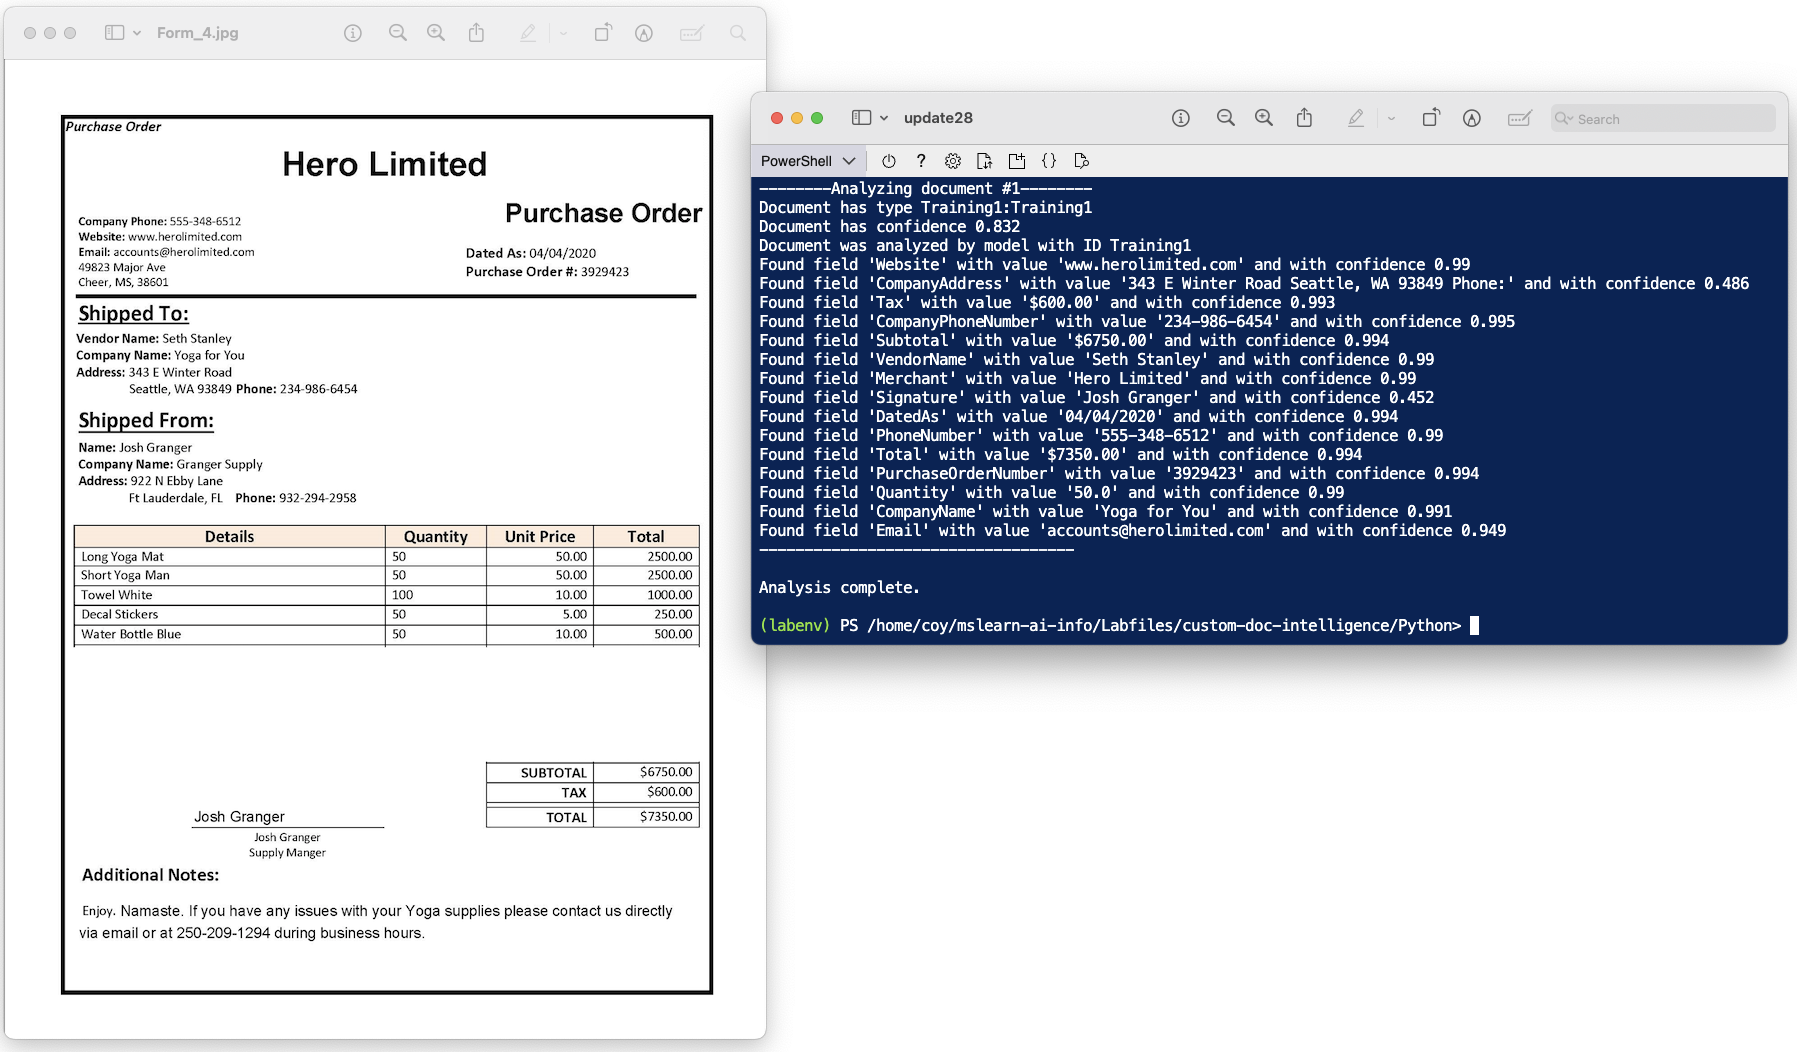
Built a custom extraction model with Azure AI Document Intelligence to automate purchase order form processing. The model reads forms, extracts structured fields, and prepares the data for database updates—streamlining what was previously a manual entry task.
🛠️ Process
- Provision Resource: Created an Azure AI Document Intelligence resource (Free F0 tier).
- Cloud Shell Setup: Launched PowerShell Cloud Shell, cloned the repo (
mslearn-ai-information-extraction), and opened thecustom-doc-intelligencefiles. - Prepare Training Data: Reviewed provided
.jpgforms +.jsonlabels, editedsetup.shwith subscription and region codes, then ran it to create a storage account, upload files, and generate a SAS URI. - Train the Model: In Document Intelligence Studio, created a project, linked to the storage container, and trained a custom extraction model in Template mode. Waited for training to succeed.
- Test the Model: Installed the Python SDK, configured the
.envwith endpoint, key, and model ID, then rantest-model.pyto validate predictions. Output returned structured fields likeMerchantandCompanyPhoneNumber.
📎 Difficulty Encountered
No major issues—ensuring the correct location code (e.g., eastus) in setup.sh was important. Training and deployment proceeded smoothly once storage was configured.
⏱ Time Required
~30 minutes.
📌 Key Takeaway
Custom models extend Document Intelligence beyond prebuilt scenarios—enabling automation for unique forms and layouts. This makes it practical for organizations to replace repetitive manual entry with consistent, machine-driven extraction.
📸 Screenshots
Extract Information from Multimodal Content
Used Azure Content Understanding inside an Azure AI Foundry hub project to extract structured data from documents, images, audio, and video. Built custom schemas and analyzers for each modality and validated results. The flow was smooth overall.
🛠️ Process
- Set Up Hub Project: Created a new AI Foundry hub-based project (Content Understanding regions: Australia East, Sweden Central, West US). Downloaded lab assets.
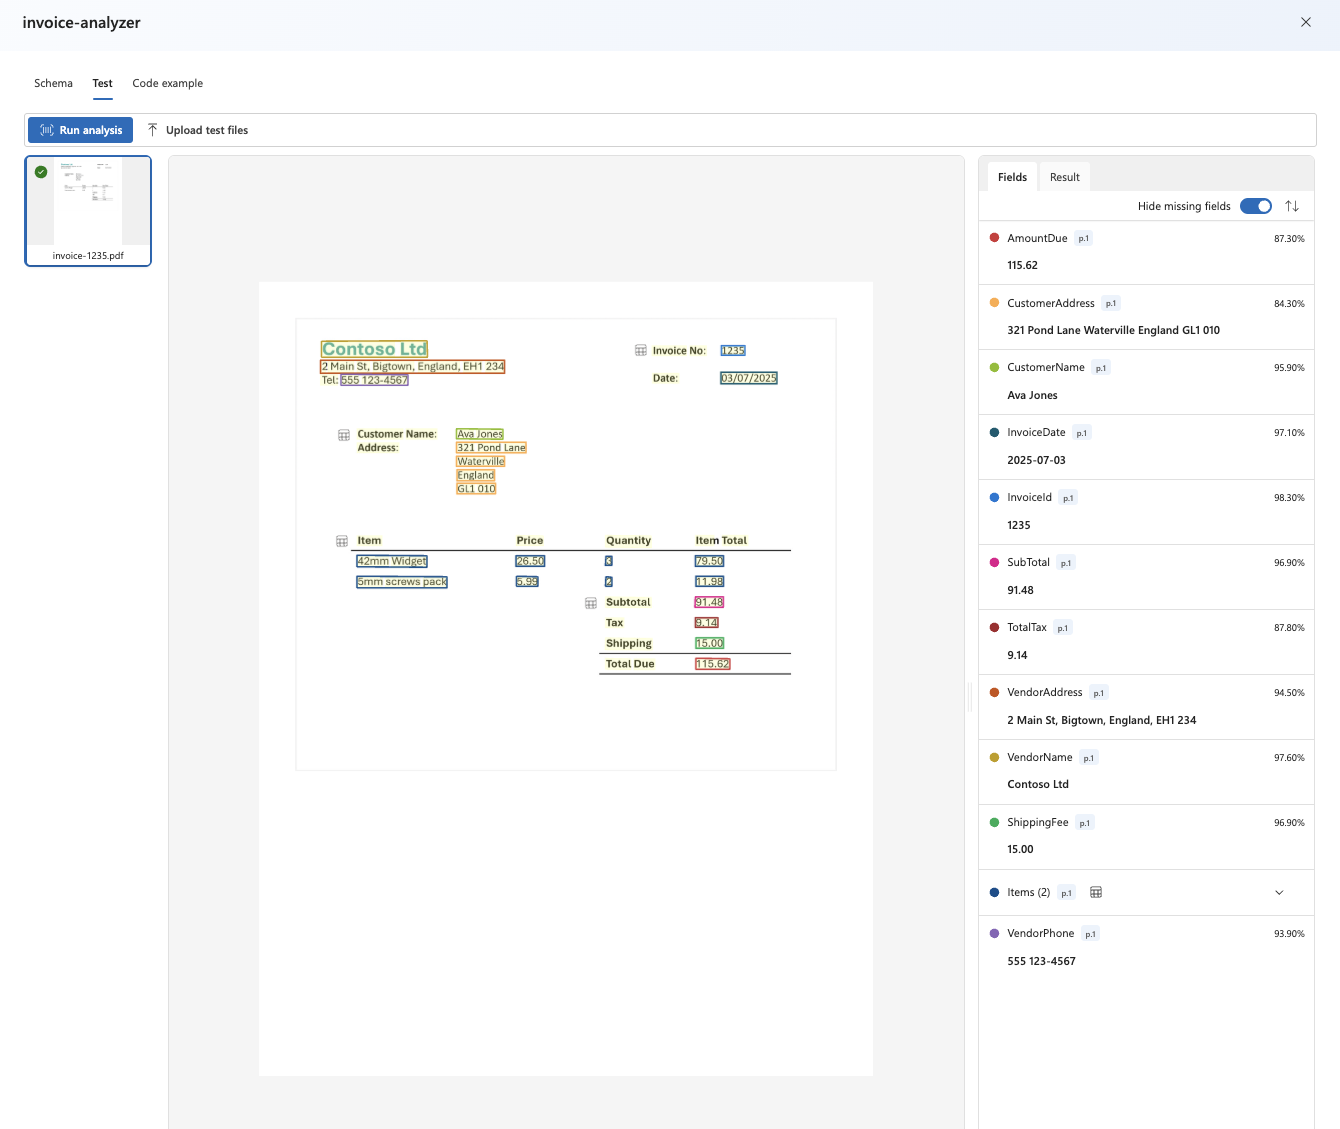
- Invoices (PDF): Created Invoice analysis task from template, trimmed unused fields, added
VendorPhoneandShippingFee, adjustedItemssubfields, tested, then builtinvoice-analyzerand verified extraction on invoice-1235.pdf (checked JSON + code sample). - Slide Image (JPG): Created Slide analysis with generated fields:
Title,Summary,Charts, plus tablesQuarterlyRevenueandProductCategories. Builtslide-analyzerand validated on slide-2.jpg (no category breakdown present, as expected). - Voicemail Audio (MP3): Used Speech transcript analysis template; added fields
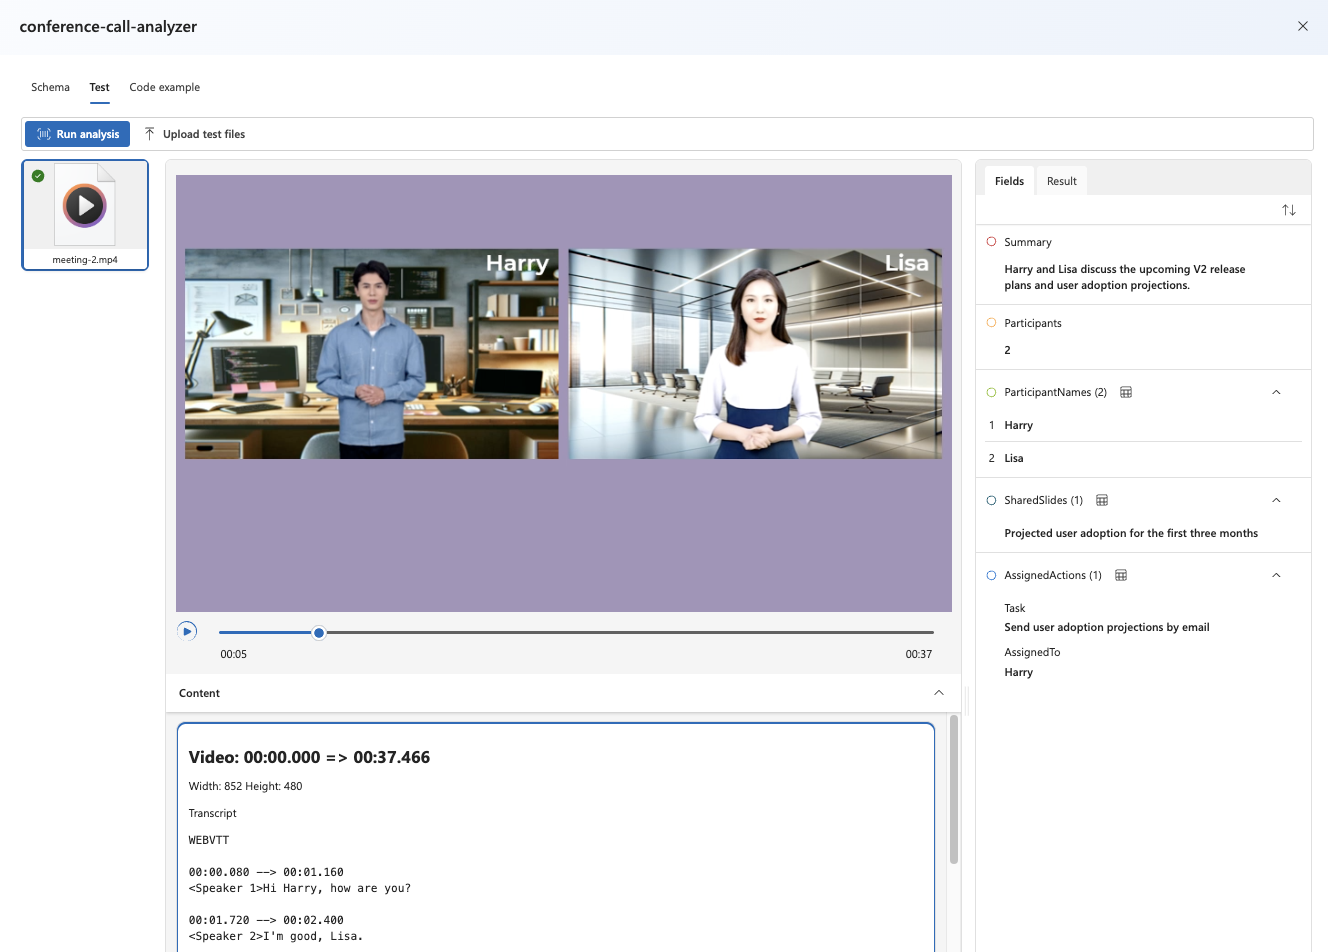
Caller,Summary,Actions,CallbackNumber,AlternativeContacts. Builtvoicemail-analyzerand tested on call-2.mp3. - Conference Call Video (MP4): Used Video analysis template; added fields
Summary,Participants,ParticipantNames,SharedSlides, and tableAssignedActions(Task, AssignedTo). Builtconference-call-analyzerand validated on meeting-2.mp4.
📎 Difficulty Encountered
Minimal issues—new hub permissions required a short wait before storage access; audio/video analysis took longer to run, as expected.
⏱ Time Required
~40 minutes.
📌 Key Takeaway
With schema-driven tasks and reusable analyzers, Azure Content Understanding can standardize extraction across modalities—PDFs, slides, voicemail audio, and meeting video—returning consistent JSON for downstream apps.
📸 Screenshots

Generate Images with DALL·E 3
In this exercise I explored the DALL·E 3 model in Azure AI Foundry using the OpenAI Python SDK to generate images from text prompts. The workflow was straightforward and completed in about 30 minutes.
🛠️ Process
- Deploy Model: Selected and deployed
dall-e-3in Azure AI Foundry. - Playground Testing: Generated images with prompts such as “robot eating spaghetti” and “robot in a restaurant.”
- Client App: Built a simple Python script to connect to the deployment, send prompts, and save generated images locally.
- Image Generation: Tested additional prompts like “robot eating pizza” and confirmed images were saved successfully.
📎 Difficulty Encountered
No major issues—SDK warnings appeared occasionally but did not affect results.
⏱ Time Required
~30 minutes.
📌 Key Takeaway
DALL·E 3 can quickly generate high-quality images from text descriptions. Detailed prompts improve creativity, and the process integrates smoothly with Azure AI Foundry and the Python SDK.

Example output: I asked the program to “create an image of the Roman Colosseum.”
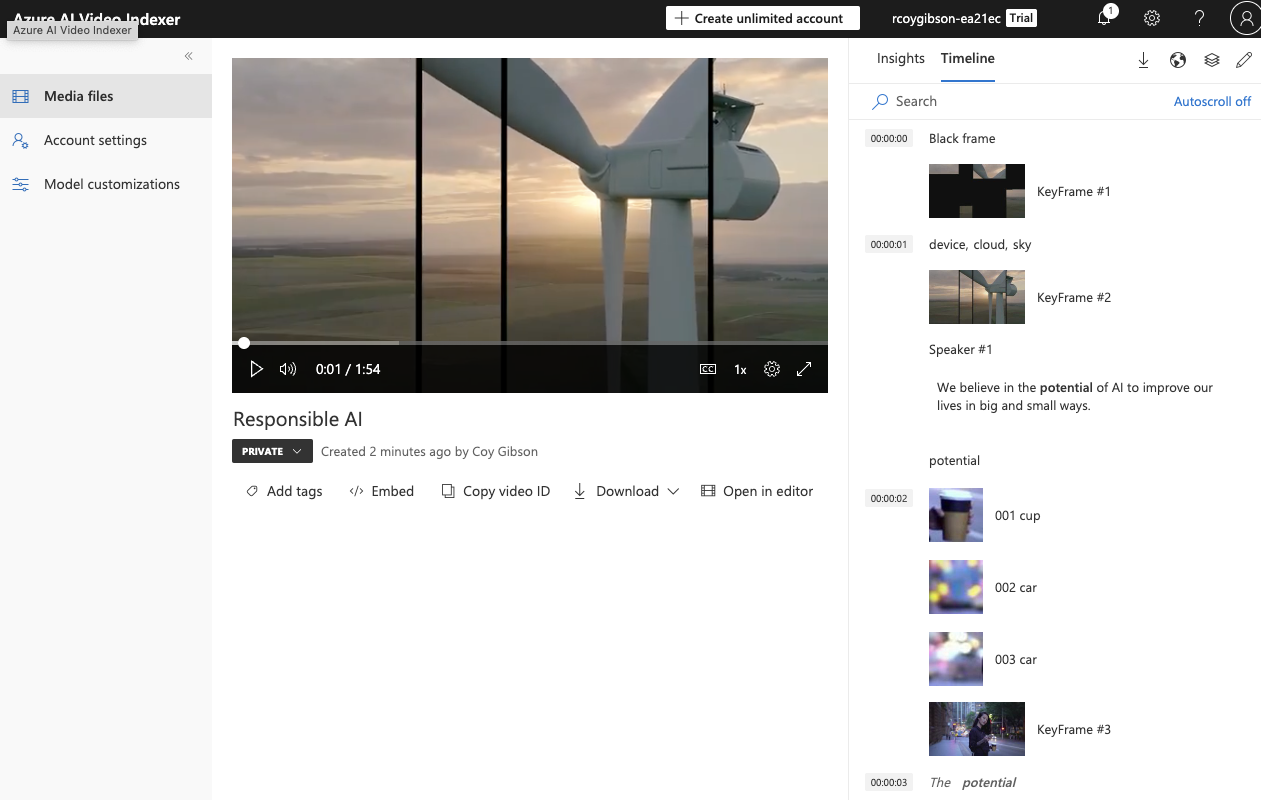
Analyze Video with Azure AI Video Indexer
I explored Azure AI Video Indexer, a service that automatically indexes video files and extracts insights such as transcripts, OCR, speakers, topics, labels, and sentiments. The exercise demonstrated how to upload and process a video, search for insights, use the REST API, and embed Video Indexer widgets.
🛠️ Process
- Upload Video: Uploaded the Responsible AI video to the Video Indexer portal and initiated automatic indexing.
- Review Insights: Viewed extracted insights including transcript, OCR text, speakers, keywords, and sentiments. Reviewed objects, named entities, and scene breakdowns.
- Search Insights: Searched for “Bee” in the insights pane and navigated to the short segment where it appeared.
- REST API: Retrieved
Account IDandAPI key, then used a PowerShell script in Azure Cloud Shell to request an access token and list videos. Confirmed the JSON response included the uploaded video. - Widgets: Embedded the Player and Insights widgets into an HTML page (
analyze-video.html) and downloaded it to view video playback with interactive insights.
📎 Difficulty Encountered
The workflow was straightforward and no significant issues occurred.
⏱ Time Required
~45 minutes.
📌 Key Takeaway
Azure AI Video Indexer provides an efficient way to extract meaningful insights from video content. With indexing, search, API access, and widget embedding, it makes video analysis accessible and shareable for applications in research, accessibility, and content management.
Train an Object Detector with Azure Custom Vision
I built an object detection model in Azure Custom Vision that finds and locates apples, bananas, and oranges in images. The focus was on labeling data and training the detector—minimal time on provisioning.
The work used the Azure Custom Vision Python SDK; equivalent SDKs exist for JavaScript, .NET, and Java.
🛠️ Process
- Create project: New Custom Vision project → Object Detection (General domain).
- Label images (UI): Upload fruit images, draw bounding boxes around apples, bananas, oranges, and confirm they appear under Tagged.
- Label images (SDK): Use
add-tagged-images.pyto readtagged-images.jsonand upload labeled regions programmatically. - Train: Click Train → Quick Training; review Precision, Recall, and mAP.
- Quick test: Use the portal’s Quick Test (e.g.,
https://aka.ms/test-fruit) to validate detections. - Publish: Publish iteration as
fruit-detectoragainst the-Predictionresource. - Client test: Run
test-detector.pyto draw boxes onproduce.jpgand saveoutput.jpg.
📎 Solving for Project ID
The Project ID needed by the scripts is in the Custom Vision portal → project Settings (⚙) → General > Project ID (not in the Azure portal). Add it to your .env.
⏱ Time Required
~45 minutes.
📌 Key Takeaway
Custom Vision makes object detection approachable: label a small dataset, train quickly, publish, and consume via SDK. Keep track of the correct resource (Training vs. Prediction) and the Project ID.
💻 Example Code — Custom Vision Object Detection (Prediction)
from azure.cognitiveservices.vision.customvision.prediction import CustomVisionPredictionClient
from msrest.authentication import ApiKeyCredentials
from matplotlib import pyplot as plt
from PIL import Image, ImageDraw, ImageFont
import numpy as np
import os

def main():
    from dotenv import load_dotenv

    # Clear the console
    os.system('cls' if os.name=='nt' else 'clear')

    try:
        # Get Configuration Settings
        load_dotenv()
        prediction_endpoint = os.getenv('PredictionEndpoint')
        prediction_key = os.getenv('PredictionKey')
        project_id = os.getenv('ProjectID')
        model_name = os.getenv('ModelName')

        # Authenticate a client for the training API
        credentials = ApiKeyCredentials(in_headers={"Prediction-key": prediction_key})
        prediction_client = CustomVisionPredictionClient(endpoint=prediction_endpoint, credentials=credentials)

        # Detect objects in the image
        image_file = 'produce.jpg'
        print('Detecting objects in', image_file)
        with open(image_file, mode="rb") as image_data:
            results = prediction_client.detect_image(project_id, model_name, image_data)

        # Loop over each prediction
        for prediction in results.predictions:
            # Get each prediction with a probability > 50%
            if (prediction.probability*100) > 50:
                print(prediction.tag_name)

        # Create and save an annotated image
        save_tagged_images(image_file, results.predictions)

    except Exception as ex:
        print(ex)

def save_tagged_images(source_path, detected_objects):
    #Load the image using Pillow
    image = Image.open(source_path)
    h, w, ch = np.array(image).shape
    # Create a figure for the results
    fig = plt.figure(figsize=(8, 8))
    plt.axis('off')

    # Display the image with boxes around each detected object
    draw = ImageDraw.Draw(image)
    lineWidth = int(w/100)
    color = 'magenta'
    for detected_object in detected_objects:
        # Only show objects with a > 50% probability
        if (detected_object.probability*100) > 50:
            # Box coordinates and dimensions are proportional - convert to absolutes
            left = detected_object.bounding_box.left * w
            top = detected_object.bounding_box.top * h
            height = detected_object.bounding_box.height * h
            width =  detected_object.bounding_box.width * w
            # Draw the box
            points = ((left,top), (left+width,top), (left+width,top+height), (left,top+height),(left,top))
            draw.line(points, fill=color, width=lineWidth)
            # Add the tag name and probability
            plt.annotate(detected_object.tag_name + ": {0:.2f}%".format(detected_object.probability * 100),(left,top), backgroundcolor=color)
    plt.imshow(image)
    outputfile = 'output.jpg'
    fig.savefig(outputfile)
    print('Results saved in', outputfile)


if __name__ == "__main__":
main()Detect and Analyze Faces with Azure AI Vision
Detecting and analyzing human faces is a core capability of computer vision. With the Azure AI Vision Face SDK, developers can detect faces in images and extract useful attributes such as head pose, occlusion, and accessories. This exercise focused on using the Face service to analyze static images.
This work was based on the Azure Vision Face Python SDK (pre-release), though applications can also be developed using JavaScript, .NET, and Java SDKs.
🛠️ Process
- Configured the client application with endpoint and key credentials.
- Added code to create and authenticate a FaceClient object.
- Specified which facial features to retrieve:
- Head pose (yaw, pitch, roll)
- Occlusion (forehead, eyes, mouth)
- Accessories (e.g., glasses, hats)
- Implemented face detection logic to:
- Print facial attributes for each detected face.
- Annotate faces with bounding boxes in the output image (detected_faces.jpg).
- Tested the application on multiple sample images:
- face1.jpg → detected a single face with head pose data.
- face2.jpg → identified another individual with accessory information.
- faces.jpg → correctly detected and annotated multiple faces in one image.
⏱ Time Required
~30 minutes.
📌 Key Takeaway
Azure AI Vision’s Face SDK provides easy-to-use tools for analyzing human faces in images. While facial recognition (identity) is restricted, attributes such as pose, occlusion, and accessories are available out of the box—enabling valuable insights for applications like accessibility, image tagging, or content moderation.
💻 Example Code — Computer Vision - Face Detection and Attributes with Azure AI Vision
from dotenv import load_dotenv
import os
import sys
from PIL import Image, ImageDraw
from matplotlib import pyplot as plt

# Import namespaces
from azure.ai.vision.face import FaceClient
from azure.ai.vision.face.models import FaceDetectionModel, FaceRecognitionModel, FaceAttributeTypeDetection01
from azure.core.credentials import AzureKeyCredential

def main():

    # Clear the console
    os.system('cls' if os.name=='nt' else 'clear')

    try:
        # Get Configuration Settings
        load_dotenv()
        cog_endpoint = os.getenv('AI_SERVICE_ENDPOINT')
        cog_key = os.getenv('AI_SERVICE_KEY')

        # Get image
        image_file = 'images/face1.jpg'
        if len(sys.argv) > 1:
            image_file = sys.argv[1]


        # Authenticate Face client
        face_client = FaceClient(
            endpoint=cog_endpoint,
            credential=AzureKeyCredential(cog_key))


        # Specify facial features to be retrieved
        features = [FaceAttributeTypeDetection01.HEAD_POSE,
                    FaceAttributeTypeDetection01.OCCLUSION,
                    FaceAttributeTypeDetection01.ACCESSORIES]

        # Get faces
        with open(image_file, mode="rb") as image_data:
            detected_faces = face_client.detect(
                image_content=image_data.read(),
                detection_model=FaceDetectionModel.DETECTION01,
                recognition_model=FaceRecognitionModel.RECOGNITION01,
                return_face_id=False,
                return_face_attributes=features,
            )

        face_count = 0
        if len(detected_faces) > 0:
            print(len(detected_faces), 'faces detected.')
            for face in detected_faces:

                # Get face properties
                face_count += 1
                print('\nFace number {}'.format(face_count))
                print(' - Head Pose (Yaw): {}'.format(face.face_attributes.head_pose.yaw))
                print(' - Head Pose (Pitch): {}'.format(face.face_attributes.head_pose.pitch))
                print(' - Head Pose (Roll): {}'.format(face.face_attributes.head_pose.roll))
                print(' - Forehead occluded?: {}'.format(face.face_attributes.occlusion["foreheadOccluded"]))
                print(' - Eye occluded?: {}'.format(face.face_attributes.occlusion["eyeOccluded"]))
                print(' - Mouth occluded?: {}'.format(face.face_attributes.occlusion["mouthOccluded"]))
                print(' - Accessories:')
                for accessory in face.face_attributes.accessories:
                    print('   - {}'.format(accessory.type))
                # Annotate faces in the image
                annotate_faces(image_file, detected_faces)


    except Exception as ex:
        print(ex)

def annotate_faces(image_file, detected_faces):
    print('\nAnnotating faces in image...')

    # Prepare image for drawing
    fig = plt.figure(figsize=(8, 6))
    plt.axis('off')
    image = Image.open(image_file)
    draw = ImageDraw.Draw(image)
    color = 'lightgreen'

    # Annotate each face in the image
    face_count = 0
    for face in detected_faces:
        face_count += 1
        r = face.face_rectangle
        bounding_box = ((r.left, r.top), (r.left + r.width, r.top + r.height))
        draw = ImageDraw.Draw(image)
        draw.rectangle(bounding_box, outline=color, width=5)
        annotation = 'Face number {}'.format(face_count)
        plt.annotate(annotation,(r.left, r.top), backgroundcolor=color)

    # Save annotated image
    plt.imshow(image)
    outputfile = 'detected_faces.jpg'
    fig.savefig(outputfile)
    print('  Results saved in {}'.format(outputfile))


if __name__ == "__main__":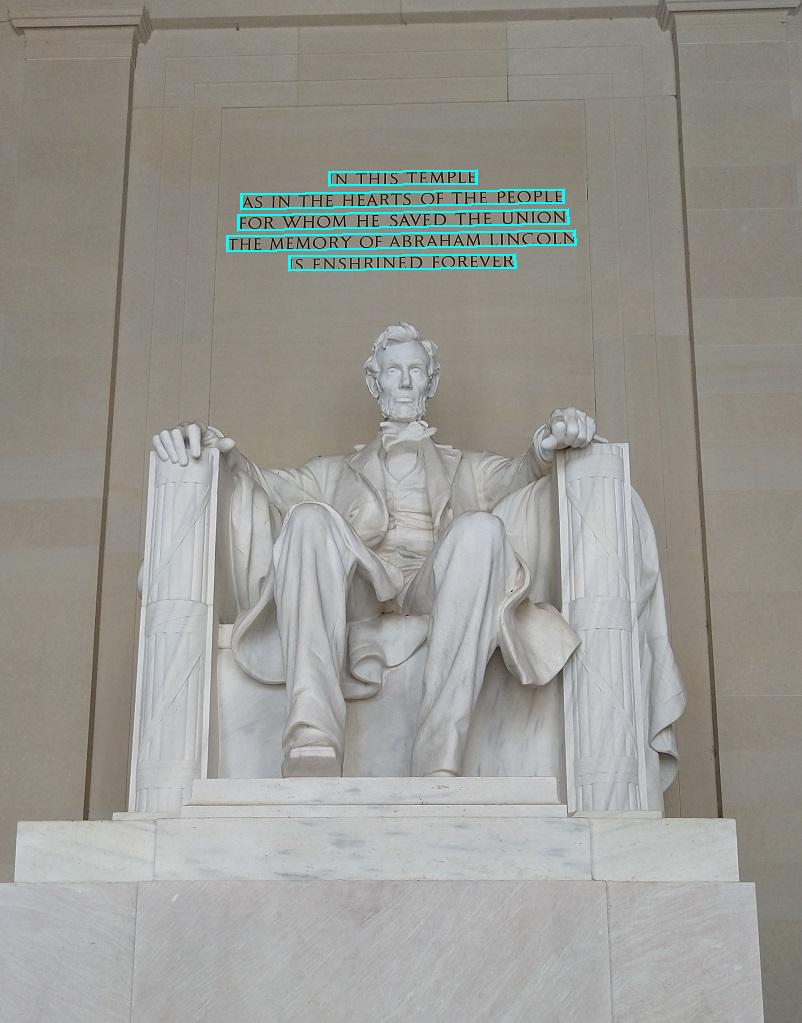
main()Read Text in Images with Azure AI Vision
Optical Character Recognition (OCR) is a subset of computer vision that enables software systems to read text in images and documents. The Azure AI Vision Image Analysis service provides an API for text extraction, allowing developers to capture printed or handwritten text from a variety of sources such as documents, business cards, and natural scene images.
This exercise was based on the Azure Vision Analysis Python SDK (pre-release), though applications can also be developed using JavaScript, .NET, and Java SDKs.
🛠️ Process
- Provisioned an Azure AI Vision resource in the Azure Portal (Computer Vision) and retrieved the endpoint and key.
- Used Azure Cloud Shell (PowerShell) to clone the GitHub repo containing the starter code.
- Installed dependencies, configured the environment with endpoint and key, and edited the client app.
- Implemented functionality to:
- Read lines of text from images and annotate them with bounding boxes.
- Extract individual words with associated confidence scores.
- Save annotated results as lines.jpg (for text lines) and words.jpg (for word-level recognition).
- Tested the program with example images:
- Lincoln.jpg → extracted caption-like text from a photo of the Lincoln statue.
- Business-card.jpg → recognized printed business card text.
- Note.jpg → successfully extracted text from a handwritten shopping list.
⏱ Time Required
~30 minutes.
📸 Screenshot
📌 Key Takeaway
Azure AI Vision's OCR capabilities make it straightforward to extract both printed and handwritten text from images. With line- and word-level recognition, this feature is well-suited for document digitization, business card scanning, and real-world applications like reading signage or notes.
Analyze Images with Azure AI Vision
Azure AI Vision enables software systems to interpret visual input by analyzing images. The service includes pre-built models for common computer vision tasks such as generating captions and tags, detecting objects and people, and even removing or isolating image backgrounds.
This exercise was based on the Azure Vision Python SDK (pre-release), though applications can also be developed using JavaScript, .NET, and Java SDKs.
🛠️ Process
- Provisioned an Azure AI Vision resource in the Azure Portal (Computer Vision).
- Deployed the resource with a Free (F0) pricing tier and retrieved the endpoint and key from the Keys and Endpoint page.
- Used Azure Cloud Shell (PowerShell) to clone the GitHub repo containing sample code files for image analysis.
- Installed dependencies, configured the environment with endpoint and key, and edited the client app.
- Extended the application by adding code to:
- Suggest captions and dense captions for images.
- Generate tags to describe image content.
- Detect and locate objects, saving annotated images.
- Detect and locate people, with bounding boxes and confidence scores.
- Ran the program on example images (street.jpg, building.jpg, person.jpg) and validated outputs, including generated captions, tags, and annotated files.
- In particular, I enjoyed testing the different features (captions, tags, objects) on the US Capitol Building image, which highlighted the tool's practical value.
⏱ Time Required
~30 minutes.
📌 Key Takeaway
Azure AI Vision provides powerful out-of-the-box capabilities for analyzing and annotating images. By combining captioning, tagging, and object/person detection, developers can quickly integrate rich visual understanding into their applications.
💻 Example Code — Computer Vision with Azure AI Vision
.jpg)
from dotenv import load_dotenv
import os
from PIL import Image, ImageDraw
import sys
from matplotlib import pyplot as plt
from azure.core.exceptions import HttpResponseError
import requests

# import namespaces
from azure.ai.vision.imageanalysis import ImageAnalysisClient
from azure.ai.vision.imageanalysis.models import VisualFeatures
from azure.core.credentials import AzureKeyCredential

def main():

    # Clear the console
    os.system('cls' if os.name=='nt' else 'clear')

    try:
        # Get Configuration Settings
        load_dotenv()
        ai_endpoint = os.getenv('AI_SERVICE_ENDPOINT')
        ai_key = os.getenv('AI_SERVICE_KEY')

        # Get image
        image_file = 'images/street.jpg'
        if len(sys.argv) > 1:
            image_file = sys.argv[1]


        # Authenticate Azure AI Vision client
        cv_client = ImageAnalysisClient(
            endpoint=ai_endpoint,
            credential=AzureKeyCredential(ai_key))

        # Analyze image
        with open(image_file, "rb") as f:
            image_data = f.read()
        print(f'\nAnalyzing {image_file}\n')

        result = cv_client.analyze(
            image_data=image_data,
            visual_features=[
                VisualFeatures.CAPTION,
                VisualFeatures.DENSE_CAPTIONS,
                VisualFeatures.TAGS,
                VisualFeatures.OBJECTS,
                VisualFeatures.PEOPLE],
        )

        # Get image captions
        if result.caption is not None:
            print("\nCaption:")
            print(" Caption: '{}' (confidence: {:.2f}%)".format(result.caption.text, result.caption.confidence * 100))

        if result.dense_captions is not None:
            print("\nDense Captions:")
            for caption in result.dense_captions.list:
                print(" Caption: '{}' (confidence: {:.2f}%)".format(caption.text, caption.confidence * 100))

        # Get image tags
        if result.tags is not None:
            print("\nTags:")
            for tag in result.tags.list:
                print(" Tag: '{}' (confidence: {:.2f}%)".format(tag.name, tag.confidence * 100))

        # Get objects in the image
        if result.objects is not None:
            print("\nObjects in image:")
            for detected_object in result.objects.list:
                # Print object tag and confidence
                print(" {} (confidence: {:.2f}%)".format(detected_object.tags[0].name, detected_object.tags[0].confidence * 100))
            # Annotate objects in the image
            show_objects(image_file, result.objects.list)

        # Get people in the image
        if result.people is not None:
            print("\nPeople in image:")

            for detected_person in result.people.list:
                if detected_person.confidence > 0.2:
                    # Print location and confidence of each person detected
                    print(" {} (confidence: {:.2f}%)".format(detected_person.bounding_box, detected_person.confidence * 100))
            # Annotate people in the image
            show_people(image_file, result.people.list)


    except Exception as ex:
        print(ex)


def show_objects(image_filename, detected_objects):
    print ("\nAnnotating objects...")

    # Prepare image for drawing
    image = Image.open(image_filename)
    fig = plt.figure(figsize=(image.width/100, image.height/100))
    plt.axis('off')
    draw = ImageDraw.Draw(image)
    color = 'cyan'

    for detected_object in detected_objects:
        # Draw object bounding box
        r = detected_object.bounding_box
        bounding_box = ((r.x, r.y), (r.x + r.width, r.y + r.height))
        draw.rectangle(bounding_box, outline=color, width=3)
        plt.annotate(detected_object.tags[0].name,(r.x, r.y), backgroundcolor=color)

    # Save annotated image
    plt.imshow(image)
    plt.tight_layout(pad=0)
    objectfile = 'objects.jpg'
    fig.savefig(objectfile)
    print('  Results saved in', objectfile)


def show_people(image_filename, detected_people):
    print ("\nAnnotating objects...")

    # Prepare image for drawing
    image = Image.open(image_filename)
    fig = plt.figure(figsize=(image.width/100, image.height/100))
    plt.axis('off')
    draw = ImageDraw.Draw(image)
    color = 'cyan'

    for detected_person in detected_people:
        if detected_person.confidence > 0.2:
            # Draw object bounding box
            r = detected_person.bounding_box
            bounding_box = ((r.x, r.y), (r.x + r.width, r.y + r.height))
            draw.rectangle(bounding_box, outline=color, width=3)

    # Save annotated image
    plt.imshow(image)
    plt.tight_layout(pad=0)
    peoplefile = 'people.jpg'
    fig.savefig(peoplefile)
    print('  Results saved in', peoplefile)


if __name__ == "__main__":
main()Custom Entity Extraction with Azure AI Language
Completed a hands-on exercise to build, train, deploy, and test a Custom Named Entity Recognition (NER) model in Azure AI Language. Everything worked smoothly; note that model training takes a little time (a few minutes) before evaluation and deployment are available.
🎯 Objective
Extract custom entities from text (classified ads) by labeling examples and training a model that recognizes:
- ItemForSale
- Price
- Location
🛠️ What I Did
- Provisioned resources
- Created an Azure AI Language resource with the Custom text classification & extraction feature enabled.
- Created a Storage account (Standard LRS).
- Configured access
- Assigned myself Storage Blob Data Contributor on the storage account to avoid 403 errors when connecting Language Studio to blob data.
- Prepared data
- Downloaded sample ads and uploaded them to a blob container named
classifieds. - Enabled anonymous read on the container (for the lab scenario only).
- Downloaded sample ads and uploaded them to a blob container named
- Built the project in Language Studio
- Created CustomEntityLab (English US).
- Labeled entities in Ad 1–9 (e.g., face cord of firewood →
ItemForSale, Denver, CO →Location, $90 →Price).
- Trained & evaluated the model
- Started a training job:
ExtractAds, with automatic train/test split. - Reviewed Model performance metrics after training completed.
- Started a training job:
- Deployed the model
- Created deployment
AdEntitiespointing toExtractAds.
- Created deployment
- Tested with Python in Azure Cloud Shell
- Cloned the lab repo, created a venv, installed
azure-ai-textanalytics==5.3.0. - Configured
.envwith endpoint, key, project, and deployment. - Used the TextAnalyticsClient to call
begin_recognize_custom_entitiesand print results.
- Cloned the lab repo, created a venv, installed
💻 Key Commands & Code
# Cloud Shell (PowerShell) — clone and navigate
rm -r mslearn-ai-language -f
git clone https://github.com/microsoftlearning/mslearn-ai-language
cd mslearn-ai-language/Labfiles/05-custom-entity-recognition/Python/custom-entities

# Setup Python environment
python -m venv labenv
./labenv/bin/Activate.ps1
pip install -r requirements.txt azure-ai-textanalytics==5.3.0
# SDK usage
from azure.core.credentials import AzureKeyCredential
from azure.ai.textanalytics import TextAnalyticsClient
credential = AzureKeyCredential(ai_key)
client = TextAnalyticsClient(endpoint=ai_endpoint, credential=credential)
operation = client.begin_recognize_custom_entities(
batchedDocuments,
project_name=project_name,
deployment_name=deployment_name
)
for doc, res in zip(files, operation.result()):
print(doc)
if res.kind == "CustomEntityRecognition":
for e in res.entities:
print(f"\tEntity '{e.text}' → '{e.category}' (score: {e.confidence_score})")⚠️ Notes & Gotchas
- Training time: Expect a few minutes before metrics and deployments are available.
- RBAC is required: Without Storage Blob Data Contributor, Language Studio cannot read from the storage container (403 error).
- Security: Anonymous container access was enabled for the lab convenience—don't do this in production.
- Data balance matters: With small datasets, be deliberate about the train/test split and entity coverage.
✅ Results
- Deployed
AdEntitiesbacked by modelExtractAds. - Python app successfully extracted
ItemForSale,Price, andLocationfrom each sample ad with confidence scores.
⏱ Time Spent
~35 minutes (excluding a few minutes of model training wait time).
🚀 Next Steps
- Add more labeled examples to improve precision/recall for each entity.
- Introduce additional entities (e.g., Contact, Condition, Category).
- Wrap the extractor in a small API and log per-entity metrics across real inputs.
Custom Text Classification with Azure AI Language
Completed a hands-on lab to build, train, evaluate, and deploy a custom text classification model using Azure AI Language. The model was then tested via a Python application in Azure Cloud Shell to classify text documents into predefined categories.
⚙️ Tools & Services Used
- Azure AI Language (Custom Text Classification)
- Azure Language Studio
- Azure Storage Account
- Azure Cloud Shell (PowerShell)
- Python 3 with Azure AI Text Analytics SDK
🔁 Key Steps
- Provisioned Azure AI Language resource with the custom text classification feature enabled.
- Configured role-based access (Storage Blob Data Owner) for secure access to training data.
- Uploaded and labeled sample articles in Language Studio across four categories (Classifieds, Sports, News, Entertainment) with defined training and testing sets.
- Trained and evaluated the model, reviewing accuracy, confidence scores, and misclassifications.
- Deployed the model to make it accessible via API.
- Tested with Python SDK in Azure Cloud Shell, outputting classifications and confidence levels for each file.
✅ Outcome
Successfully created and deployed a functional custom text classification model with clean integration into a Python workflow. The exercise was completed without major issues, reinforcing skills in Azure AI Language configuration, data labeling, and SDK-based model interaction.
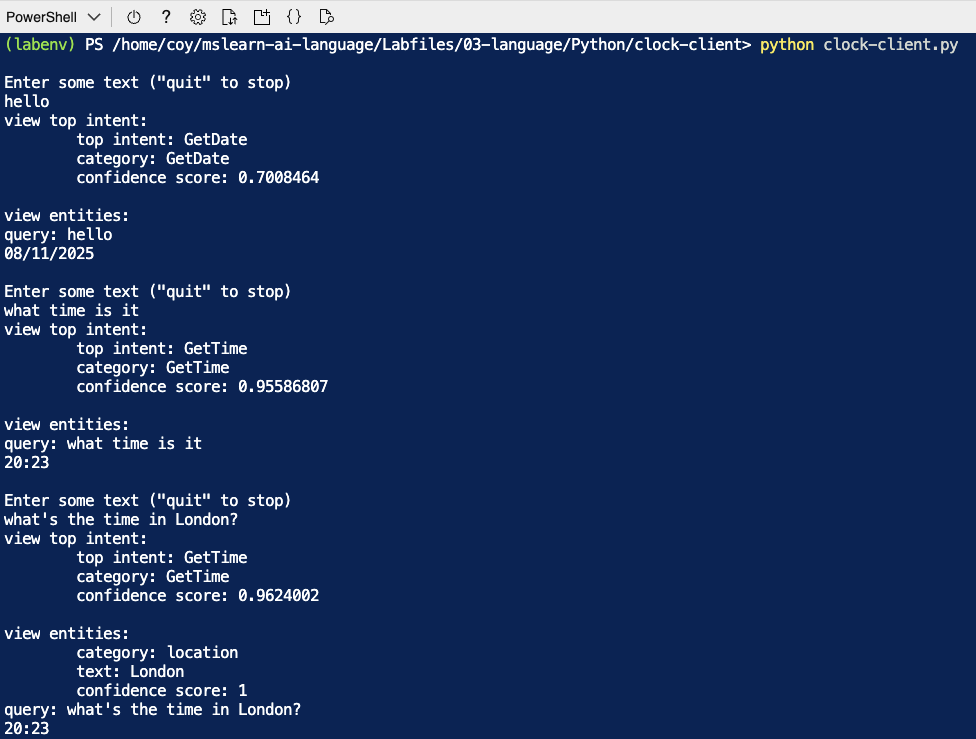
Creating a Conversational Language Understanding Model
In this exercise, I used Azure AI Language Studio to design and deploy a Conversational Language Understanding model, then integrated it into a Python client application. The project demonstrated how to interpret user utterances, predict intent, and identify relevant entities in natural language input.
🔑 Key Steps & Learnings
- Provisioned an Azure AI Language resource and set up a Conversational Language Understanding project.
- Defined multiple intents (GetTime, GetDay, GetDate) and labeled them with varied natural language utterances.
- Added entities to improve contextual understanding:
- Learned Entity: Location (e.g., London, Paris, New York)
- List Entity: Weekday (e.g., Monday → Mon)
- Prebuilt Entity: DateTime recognition
- Trained, tested, and deployed the model to a production endpoint, verifying accuracy with sample utterances.
- Built a Python client app using the Azure AI Language Conversations SDK to:
- Send user input to the model's endpoint.
- Receive and parse predicted intents and entities.
- Execute simple application logic based on predictions (returning time, date, or day).
🛠️ Skills Applied
- Natural Language Processing (NLP) with Azure AI Language Service
- Intent and entity modeling for conversational AI
- Python SDK integration and REST-based model consumption
- Model training, evaluation, and deployment best practices
✅ Outcome
The completed application could understand and respond to user queries like "What's the time in London?" by correctly identifying the intent (GetTime) and entity (Location: London), then returning a relevant response. This exercise reinforced my ability to design, deploy, and integrate language understanding models for real-world conversational AI applications.
📸 Screenshot
💻 Code Example
#Create a Python script to analyze text files using Azure AI Language service

from dotenv import load_dotenv
import os
import json
from datetime import datetime, timedelta, date, timezone
from dateutil.parser import parse as is_date

# Import namespaces
from azure.core.credentials import AzureKeyCredential
from azure.ai.language.conversations import ConversationAnalysisClient

def main():
    try:
        # Get Configuration Settings
        load_dotenv()
        ls_prediction_endpoint = os.getenv('LS_CONVERSATIONS_ENDPOINT')
        ls_prediction_key = os.getenv('LS_CONVERSATIONS_KEY')

        # Get user input (until they enter "quit")
        userText = ''
        while userText.lower() != 'quit':
            userText = input('\nEnter some text ("quit" to stop)\n')
            if userText.lower() != 'quit':

                # Create a client for the Language service model
                client = ConversationAnalysisClient(
                    ls_prediction_endpoint, AzureKeyCredential(ls_prediction_key))

                # Call the Language service model to get intent and entities
                cls_project = 'Clock'
                deployment_slot = 'production'

                with client:
                    query = userText
                    result = client.analyze_conversation(
                        task={
                            "kind": "Conversation",
                            "analysisInput": {
                                "conversationItem": {
                                    "participantId": "1",
                                    "id": "1",
                                    "modality": "text",
                                    "language": "en",
                                    "text": query
                                },
                                "isLoggingEnabled": False
                            },
                            "parameters": {
                                "projectName": cls_project,
                                "deploymentName": deployment_slot,
                                "verbose": True
                            }
                        }
                    )

                top_intent = result["result"]["prediction"]["topIntent"]
                entities = result["result"]["prediction"]["entities"]

                print("view top intent:")
                print("\ttop intent: {}".format(result["result"]["prediction"]["topIntent"]))
                print("\tcategory: {}".format(result["result"]["prediction"]["intents"][0]["category"]))
                print("\tconfidence score: {}\n".format(result["result"]["prediction"]["intents"][0]["confidenceScore"]))

                print("view entities:")
                for entity in entities:
                    print("\tcategory: {}".format(entity["category"]))
                    print("\ttext: {}".format(entity["text"]))
                    print("\tconfidence score: {}".format(entity["confidenceScore"]))

                print("query: {}".format(result["result"]["query"]))

                # Apply the appropriate action
                if top_intent == 'GetTime':
                    location = 'local'
                    # Check for entities
                    if len(entities) > 0:
                        # Check for a location entity
                        for entity in entities:
                            if 'Location' == entity["category"]:
                                # ML entities are strings, get the first one
                                location = entity["text"]
                    # Get the time for the specified location
                    print(GetTime(location))

                elif top_intent == 'GetDay':
                    date_string = date.today().strftime("%m/%d/%Y")
                    # Check for entities
                    if len(entities) > 0:
                        # Check for a Date entity
                        for entity in entities:
                            if 'Date' == entity["category"]:
                                # Regex entities are strings, get the first one
                                date_string = entity["text"]
                    # Get the day for the specified date
                    print(GetDay(date_string))

                elif top_intent == 'GetDate':
                    day = 'today'
                    # Check for entities
                    if len(entities) > 0:
                        # Check for a Weekday entity
                        for entity in entities:
                            if 'Weekday' == entity["category"]:
                            # List entities are lists
                                day = entity["text"]
                    # Get the date for the specified day
                    print(GetDate(day))

                else:
                    # Some other intent (for example, "None") was predicted
                    print('Try asking me for the time, the day, or the date.')

    except Exception as ex:
        print(ex)

def GetTime(location):
    time_string = ''
    # Note: Simplified time zone handling for demo purposes
    if location.lower() == 'local':
        now = datetime.now()
        time_string = '{}:{:02d}'.format(now.hour,now.minute)
    elif location.lower() == 'london':
        utc = datetime.now(timezone.utc)
        time_string = '{}:{:02d}'.format(utc.hour,utc.minute)
    elif location.lower() == 'new york':
        time = datetime.now(timezone.utc) + timedelta(hours=-5)
        time_string = '{}:{:02d}'.format(time.hour,time.minute)
    else:
        time_string = "I don't know what time it is in {}".format(location)
    return time_string

if __name__ == "__main__":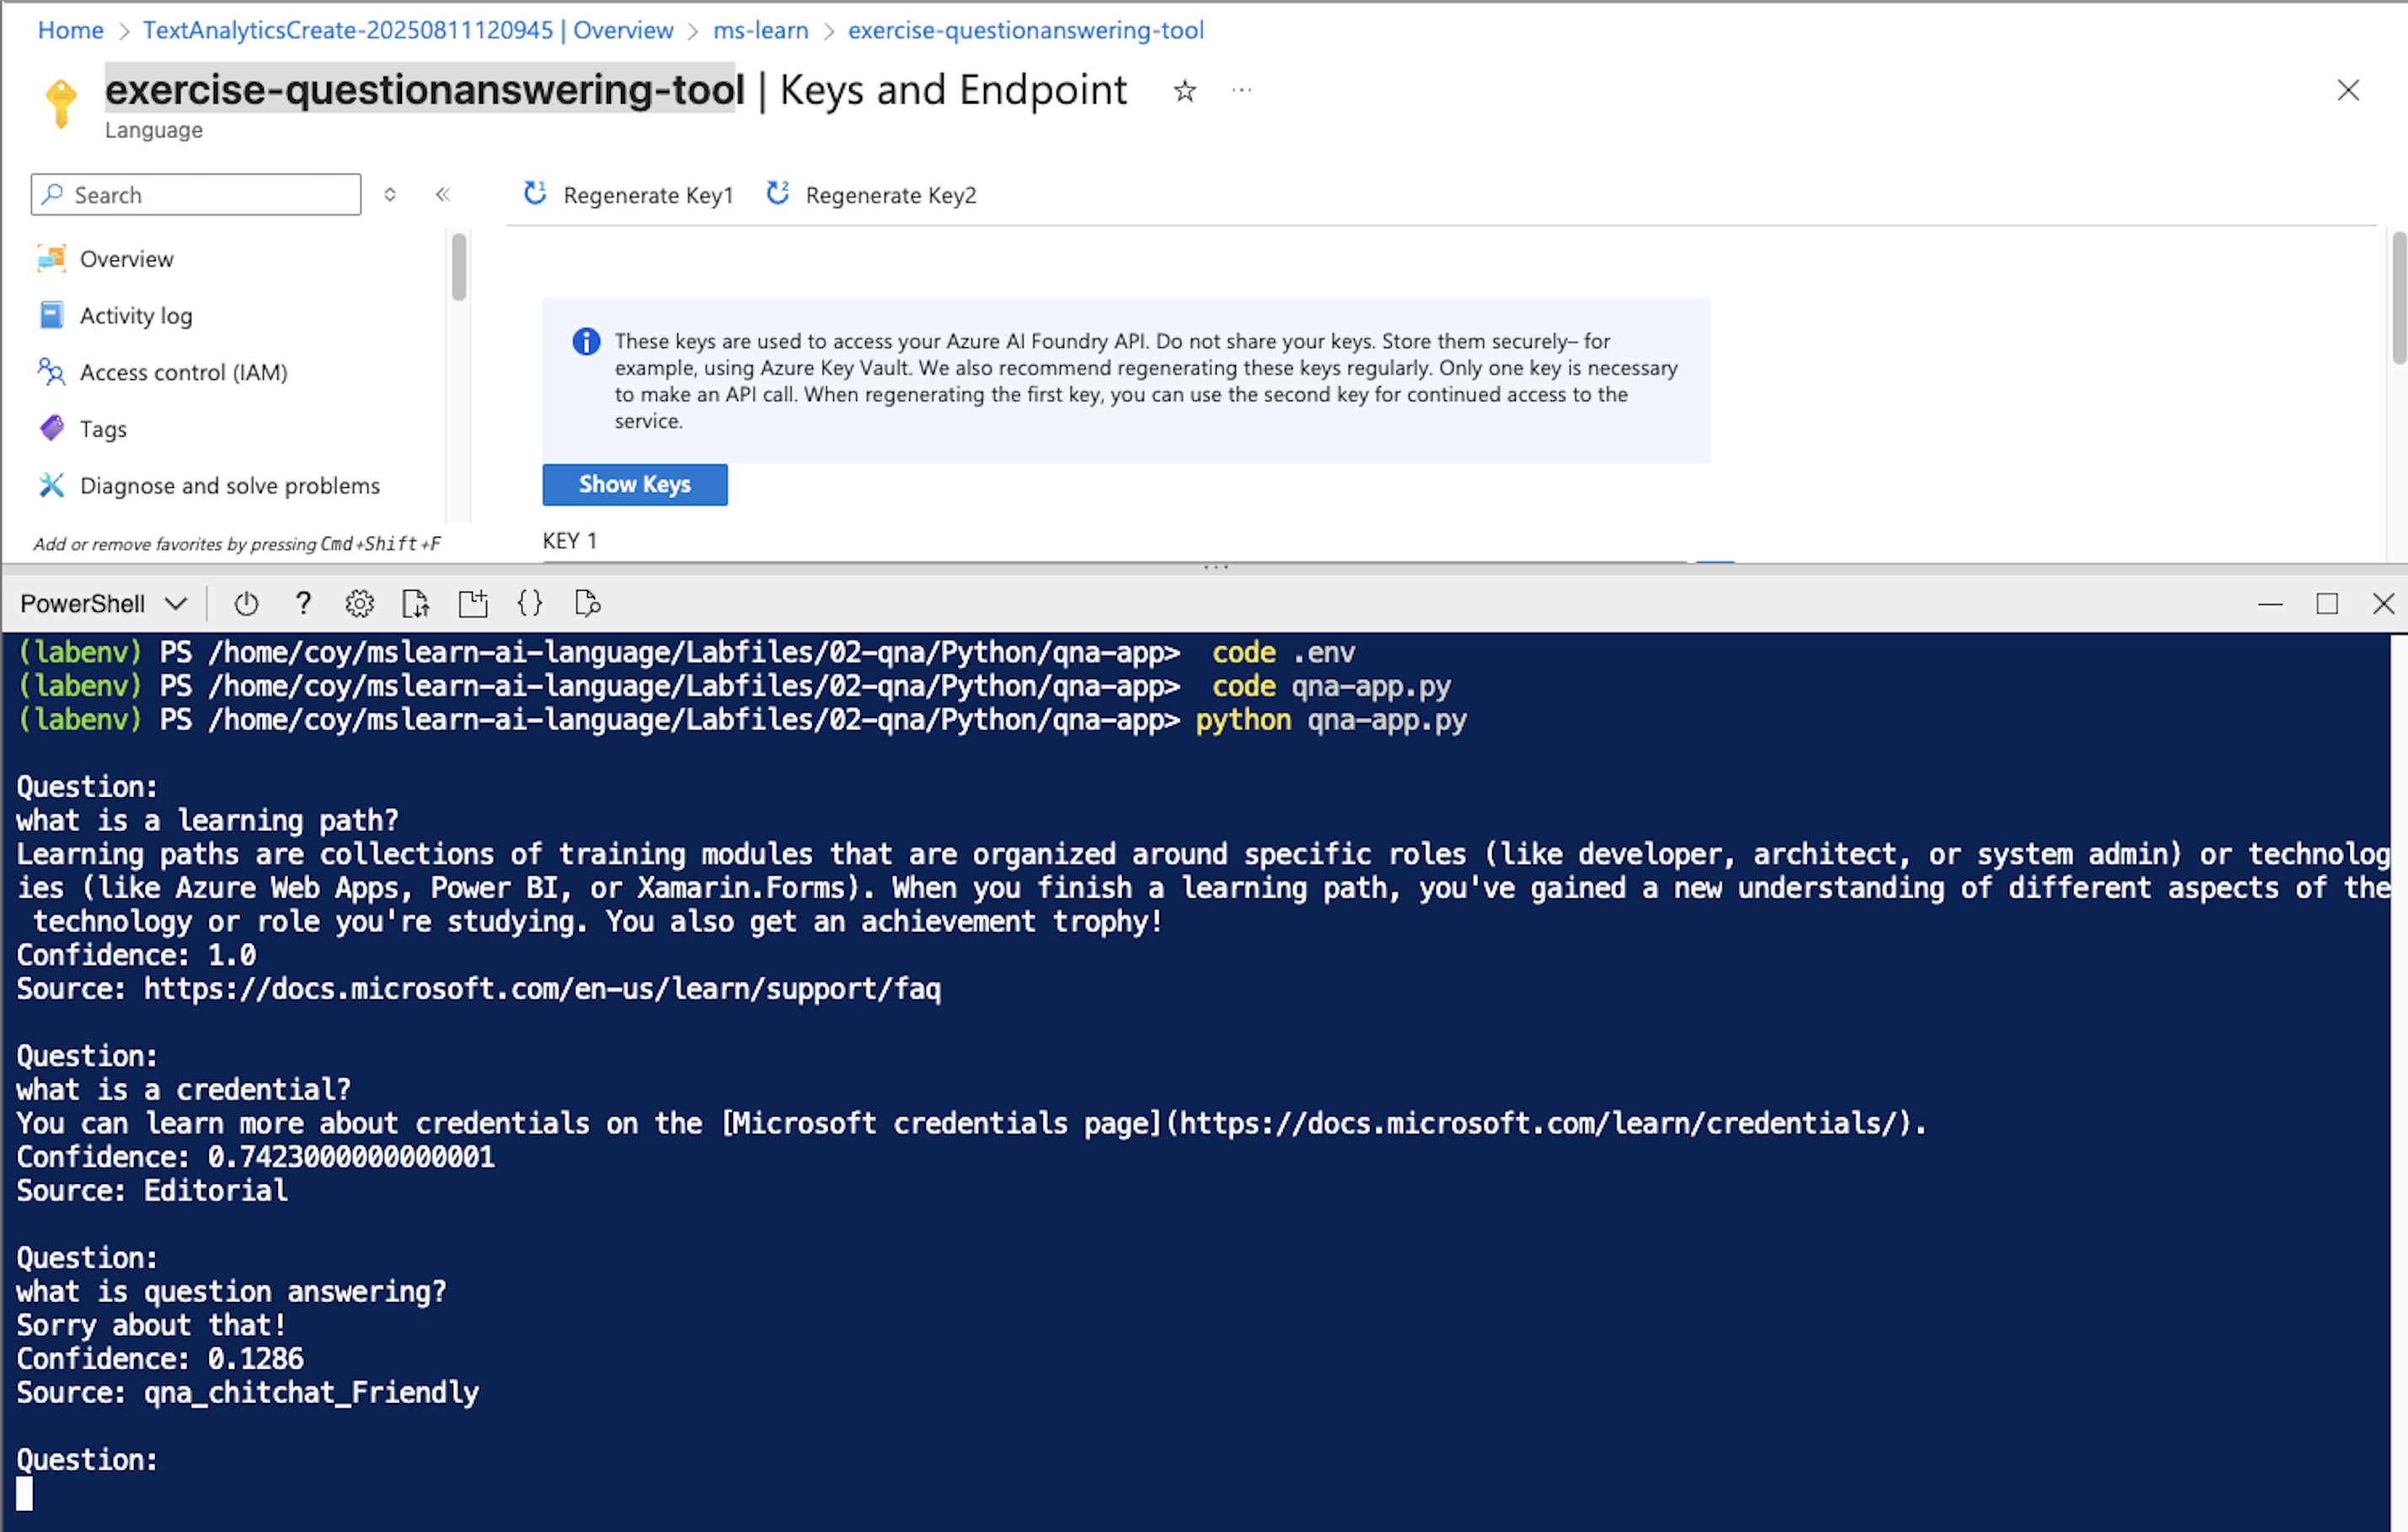
main()Creating a Question Answering Solution with Azure AI Language
As part of my AI-102: Designing and Implementing an Azure AI Solution certification path, I completed an exercise in Natural Language Processing (NLP) using Azure AI Language's Custom Question Answering capability.
The scenario: many organizations maintain FAQ pages, but searching large documents can be inefficient. Azure AI Language solves this by enabling a knowledge base of question-and-answer pairs that can be queried in natural language, often powering bots and automated support tools.
🛠️ What I Built
I created a Custom Question Answering project called LearnFAQ to serve as a knowledge base for Microsoft Learn's FAQ, supplemented with conversational "chit chat" responses for a more natural experience.
🔁 Key Steps
- Provisioning the Azure AI Language Service – with the Question Answering feature enabled, backed by Azure Cognitive Search.
- Creating the Knowledge Base – importing content from Microsoft Learn's FAQ page and adding custom Q&A pairs.
- Enhancing Conversations – adding alternate questions and follow-up prompts to support multi-turn interactions.
- Training & Testing – verifying the bot could respond to factual queries, conversational greetings, and follow-up prompts.
- Deploying the Knowledge Base – making it available via REST API for integration with applications.
- Developing a Python Client – using the azure-ai-language-questionanswering SDK to build a simple command-line app that:
- Accepts user questions
- Submits them to the deployed knowledge base
- Returns answers with confidence scores and source references
⚙️ Technical Highlights
- Azure Services Used: Azure AI Language, Azure Cognitive Search
- Languages & Tools: Python, Azure SDK for Question Answering, Cloud Shell
- Key Concepts Practiced: Knowledge base design, multi-turn conversation flows, REST API deployment, SDK integration
💡 Takeaway
This exercise demonstrated how to transform static FAQ content into an intelligent, searchable knowledge base—and how easily it can be connected to an application for dynamic, conversational experiences. This approach is highly scalable and adaptable for customer support, internal help desks, and educational platforms.
📸 Screenshot
💻 Code Example
#NLP exercise: Question Answering with Azure AI

from dotenv import load_dotenv
import os

# import namespaces
from azure.core.credentials import AzureKeyCredential
from azure.ai.language.questionanswering import QuestionAnsweringClient

def main():
    try:
        # Get Configuration Settings
        load_dotenv()
        ai_endpoint = os.getenv('AI_SERVICE_ENDPOINT')
        ai_key = os.getenv('AI_SERVICE_KEY')
        ai_project_name = os.getenv('QA_PROJECT_NAME')
        ai_deployment_name = os.getenv('QA_DEPLOYMENT_NAME')

        # Create client using endpoint and key
        credential = AzureKeyCredential(ai_key)
        ai_client = QuestionAnsweringClient(endpoint=ai_endpoint, credential=credential)

        # Submit a question and display the answer
        user_question = ''
        while True:
            user_question = input('\nQuestion:\n')
            if user_question.lower() == "quit":
                break
            response = ai_client.get_answers(question=user_question,
                                            project_name=ai_project_name,
                                            deployment_name=ai_deployment_name)
            for candidate in response.answers:
                print(candidate.answer)
                print("Confidence: {}".format(candidate.confidence))
                print("Source: {}".format(candidate.source))


    except Exception as ex:
        print(ex)


if __name__ == "__main__":
main()Multi-Agent AI Triage Solution Attempt
🎯 Goal
Develop and test a multi-agent AI solution using the Azure AI Foundry Agent Service that collaborates to triage support tickets by determining priority, assigning the appropriate team, and estimating the required effort.
🛠️ Process
- Platform Setup:
Logged into the Azure AI Foundry portal and attempted to deploy the gpt-4o model and create a new project with proper regional settings. - Environment Prep:
Opened PowerShell in Azure Cloud Shell, cloned the GitHub repo, and configured the .env file with the intended project endpoint and model deployment name. - Agent Architecture:
Studied the structure and purpose of the primary triage agent and three supporting agents: priority, team, and effort. Each agent was created with clearly scoped roles and connected via ConnectedAgentTool. - Python Script Implementation:
Edited the agent_triage.py file to define agents, construct a processing thread, and pass a sample user issue through the pipeline. - Azure Login & Execution Attempt:
Signed in using az login and attempted to run the code. However, the execution failed due to an invalid_engine_error — specifically, it could not resolve the model info for gpt-4o.
🧠 Key Takeaways
- The architecture of a multi-agent AI system is powerful for task delegation and orchestration.
- I now understand how agents can be modularized and coordinated using the Azure AI SDK for Python.
- Encountered a region quota issue for gpt-4o — preventing me from deploying the model or running the script successfully in PowerShell.
- Found online forums and discussions where other learners encountered the same limitation, indicating it may be an Azure-side quota or preview-region mismatch.
📎 Next Steps
- Try creating the Azure AI Foundry project in a different region with available quota.
- Confirm gpt-4o deployment registration before running the script.
- Once resolved, re-run the agent_triage.py file to observe actual AI agent collaboration.
📂 Code
The full Python implementation (agent_triage.py) used in this exercise is included below for reference:
import os
from dotenv import load_dotenv

# Add references
from azure.ai.agents import AgentsClient
from azure.ai.agents.models import ConnectedAgentTool, MessageRole, ListSortOrder, ToolSet, FunctionTool
from azure.identity import DefaultAzureCredential

# Clear the console
os.system('cls' if os.name=='nt' else 'clear')

# Load environment variables from .env file
load_dotenv()
project_endpoint = os.getenv("PROJECT_ENDPOINT")
model_deployment = os.getenv("MODEL_DEPLOYMENT_NAME")

# Priority agent definition
priority_agent_name = "priority_agent"
priority_agent_instructions = """
Assess how urgent a ticket is based on its description.

Respond with one of the following levels:
- High: User-facing or blocking issues
- Medium: Time-sensitive but not breaking anything
- Low: Cosmetic or non-urgent tasks

Only output the urgency level and a very brief explanation.
"""

# Team agent definition
team_agent_name = "team_agent"
team_agent_instructions = """
Decide which team should own each ticket.

Choose from the following teams:
- Frontend
- Backend
- Infrastructure
- Marketing

Base your answer on the content of the ticket. Respond with the team name and a very brief explanation.
"""

# Effort agent definition
effort_agent_name = "effort_agent"
effort_agent_instructions = """
Estimate how much work each ticket will require.

Use the following scale:
- Small: Can be completed in a day
- Medium: 2-3 days of work
- Large: Multi-day or cross-team effort

Base your estimate on the complexity implied by the ticket. Respond with the effort level and a brief justification.
"""

# Instructions for the primary agent
triage_agent_instructions = """
Triage the given ticket. Use the connected tools to determine the ticket's priority,
which team it should be assigned to, and how much effort it may take.
"""

# Connect to the agents client
agents_client = AgentsClient(
    endpoint=project_endpoint,
    credential=DefaultAzureCredential(
        exclude_environment_credential=True,
        exclude_managed_identity_credential=True
    ),
)

with agents_client:

    # Create the priority agent on the Azure AI agent service
    priority_agent = agents_client.create_agent(
        model=model_deployment,
        name=priority_agent_name,
        instructions=priority_agent_instructions
    )

    # Create a connected agent tool for the priority agent
    priority_agent_tool = ConnectedAgentTool(
        id=priority_agent.id,
        name=priority_agent_name,
        description="Assess the priority of a ticket"
    )

    # Create the team agent and connected tool
    team_agent = agents_client.create_agent(
        model=model_deployment,
        name=team_agent_name,
        instructions=team_agent_instructions
    )
    team_agent_tool = ConnectedAgentTool(
        id=team_agent.id,
        name=team_agent_name,
        description="Determines which team should take the ticket"
    )

    # Create the effort agent and connected tool
    effort_agent = agents_client.create_agent(
        model=model_deployment,
        name=effort_agent_name,
        instructions=effort_agent_instructions
    )
    effort_agent_tool = ConnectedAgentTool(
        id=effort_agent.id,
        name=effort_agent_name,
        description="Determines the effort required to complete the ticket"
    )

    # Create a main agent with the Connected Agent tools
    agent = agents_client.create_agent(
        model=model_deployment,
        name="triage-agent",
        instructions=triage_agent_instructions,
        tools=[
            priority_agent_tool.definitions[0],
            team_agent_tool.definitions[0],
            effort_agent_tool.definitions[0]
        ]
    )

    # Create thread for the chat session
    print("Creating agent thread.")
    thread = agents_client.threads.create()

    # Create the ticket prompt
    prompt = "Users can't reset their password from the mobile app."

    # Send a prompt to the agent
    message = agents_client.messages.create(
        thread_id=thread.id,
        role=MessageRole.USER,
        content=prompt,
    )

    # Create and process Agent run in thread with tools
    print("Processing agent thread. Please wait.")
    run = agents_client.runs.create_and_process(thread_id=thread.id, agent_id=agent.id)

    if run.status == "failed":
        print(f"Run failed: {run.last_error}")

    # Fetch and log all messages
    messages = agents_client.messages.list(thread_id=thread.id, order=ListSortOrder.ASCENDING)
    for message in messages:
        if message.text_messages:
            last_msg = message.text_messages[-1]
            print(f"{message.role}:\n{last_msg.text.value}\n")

    # Delete the agent when done
    print("Cleaning up agents:")
    agents_client.delete_agent(agent.id)
    print("Deleted triage agent.")

    # Delete the connected agents when done
    agents_client.delete_agent(priority_agent.id)
    print("Deleted priority agent.")
    agents_client.delete_agent(team_agent.id)
    print("Deleted team agent.")
    agents_client.delete_agent(effort_agent.id)
print("Deleted effort agent.")Multi-Agent Orchestration with Azure AI Agents
Expanded my AI engineering toolkit by implementing a multi-agent chat orchestration workflow using the Semantic Kernel SDK and Azure AI Agent Service. This hands-on exercise walked through creating an Incident Manager and a DevOps Assistant, coordinating them in a simulated environment to detect and resolve service issues through log file analysis.
🎯 Goal
Build a coordinated multi-agent AI system where one agent detects system issues and another executes remediation actions, using a shared chat and custom orchestration strategies.
🛠️ Process
- Project Deployment:
Deployed gpt-4o in Azure AI Foundry. Updated the TPM settings to avoid rate limit issues. - Environment Setup:
Used Azure Cloud Shell (PowerShell/classic view) to clone and prep the GitHub repo mslearn-ai-agents. Installed required packages and configured .env with project endpoint and model name. - Agent Definition:
Defined two agents: IncidentManager (analyzes logs and recommends resolution actions) and DevOpsAssistant (executes corrective actions and logs outcomes). Added appropriate plugins (LogFilePlugin and DevopsPlugin) for each. - Strategy Implementation:
Created a SelectionStrategy to determine which agent speaks next. Used ApprovalTerminationStrategy to end the chat once "no action needed" is detected. - Group Chat Execution:
Orchestrated both agents in a AgentGroupChat, sending them sample logs. Validated correct alternating behavior between the agents and resolution logging.
✅ Outcome
No errors encountered. The process was smooth and intuitive. I now better understand agent coordination patterns and how Semantic Kernel supports multi-agent systems. Also bookmarked the GitHub repo for future reference when designing coordinated agent flows.
Agent Custom Functions & Support Scenario Simulation
In this module of the Microsoft AI Agents learning path, I focused on building an AI agent that simulates a technical support scenario. The objective was to create a user-facing experience where the agent could respond to a user problem, call a custom function to log the issue, and then generate a support log file in response.
🔍 Focus
To simulate a technical support conversation using an AI agent and a custom function, where the agent logs a user's issue and outputs a corresponding support file.
🛠️ Process
- Model Deployment Coordination: Before running the Python script in the Azure CLI, I had to wait for the model deployment in AI Foundry to fully register.
- Support Scenario Setup: I created a custom Python function that accepts a support issue (e.g., "my computer won't turn on") and writes it to a log file. Registered this function with the agent using the CodeInterpreterTool and designated its purpose as CUSTOM_FUNCTION.
- Agent Interaction: Through the agent, I initiated a conversation by typing: "I have a technical problem." The agent successfully triggered the logging function and returned a file with my issue logged, simulating a real-world support workflow.
✅ Key Takeaways
- The AI agent framework supports real-world customer service workflows by integrating file output from custom functions
- Coordination with model deployment is essential—deployment delays can block CLI interactions
- This exercise showed how natural user prompts can trigger backend functions to automate standard support operations
📄 Code Example
import os
from dotenv import load_dotenv
from typing import Any
from pathlib import Path

# Add references
from azure.identity import DefaultAzureCredential
from azure.ai.agents import AgentsClient
from azure.ai.agents.models import FunctionTool, ToolSet, ListSortOrder, MessageRole
from user_functions import user_functions

def main():
    # Clear the console
    os.system('cls' if os.name=='nt' else 'clear')

    # Load environment variables from .env file
    load_dotenv()
    project_endpoint= os.getenv("PROJECT_ENDPOINT")
    model_deployment = os.getenv("MODEL_DEPLOYMENT_NAME")

    # Connect to the Agent client
    agent_client = AgentsClient(
    endpoint=project_endpoint,
    credential=DefaultAzureCredential
        (exclude_environment_credential=True,
         exclude_managed_identity_credential=True)
    )

    # Define an agent that can use the custom functions
    with agent_client:
        functions = FunctionTool(user_functions)
        toolset = ToolSet()
        toolset.add(functions)
        agent_client.enable_auto_function_calls(toolset)

        agent = agent_client.create_agent(
            model=model_deployment,
            name="support-agent",
            instructions="""You are a technical support agent.
                            When a user has a technical issue, you get their email address and a description of the issue.
                            Then you use those values to submit a support ticket using the function available to you.
                            If a file is saved, tell the user the file name.
                        """,
            toolset=toolset
        )

        thread = agent_client.threads.create()
        print(f"You're chatting with: {agent.name} ({agent.id})")

        # Loop until the user types 'quit'
        while True:
            # Get input text
            user_prompt = input("Enter a prompt (or type 'quit' to exit): ")
            if user_prompt.lower() == "quit":
                break
            if len(user_prompt) == 0:
                print("Please enter a prompt.")
                continue

            # Send a prompt to the agent
            message = agent_client.messages.create(
                thread_id=thread.id,
                role="user",
                content=user_prompt
            )
            run = agent_client.runs.create_and_process(thread_id=thread.id, agent_id=agent.id)

            # Check the run status for failures
            if run.status == "failed":
                print(f"Run failed: {run.last_error}")

            # Show the latest response from the agent
            last_msg = agent_client.messages.get_last_message_text_by_role(
                thread_id=thread.id,
                role=MessageRole.AGENT,
            )
            if last_msg:
                print(f"Last Message: {last_msg.text.value}")

        # Get the conversation history
            print("\nConversation Log:\n")
            messages = agent_client.messages.list(thread_id=thread.id, order=ListSortOrder.ASCENDING)
            for message in messages:
                if message.text_messages:
                    last_msg = message.text_messages[-1]
                    print(f"{message.role}: {last_msg.text.value}\n")

        # Clean up
        agent_client.delete_agent(agent.id)
        print("Deleted agent")

if __name__ == '__main__':
main()Designing & Deploying AI Agents in Azure AI Studio
Built on my foundational knowledge of AI agents by completing two back-to-back modules: Agent Fundamentals and Build Your First AI Agent. Together, these exercises moved from theoretical architecture to hands-on implementation, guiding me through the process of designing a task-solving agent that uses tools, memory, and reasoning to operate autonomously.
🎯 Goal
Gain practical experience in designing, configuring, and deploying an AI agent that can reason, act with tools, recall short-term memory, and successfully solve user tasks in a real environment.
🛠️ Process
- AGENT ARCHITECTURE: Reviewed the components of Azure AI agents—planner, executor, memory, and toolset—and how they work together to process complex tasks.
- AGENT CREATION: Used Azure AI Studio to build a fully functional agent from scratch with capabilities including natural language interaction, memory storage, and tool usage.
- TOOL DEFINITIONS: Connected external tools such as a calculator and search retrieval, allowing the agent to act dynamically based on the user's intent.
- MEMORY ACTIVATION: Enabled short-term memory so the agent could reference earlier user inputs during multi-turn conversations.
- ROLE & GOAL CONFIGURATION: Defined the agent's persona and mission, testing how prompt design and personality impact task performance.
- LIVE TESTING: Interacted with the deployed agent using real test prompts and reviewed the intermediate reasoning and decision paths.
✅ Outcome
- Successfully built and tested a custom AI agent in Azure AI Studio
- Integrated tools and memory to enable multi-step, context-aware problem solving
- Observed and debugged the planner's internal logic for transparent, explainable actions
- Developed a reusable framework for agent design applicable across real-world LLM use cases
📌 Key Takeaways
- AI agents combine reasoning, memory, and tool-use into a cohesive task-solving system
- Prompt clarity, role definition, and planning configuration greatly impact agent behavior
- Short-term memory allows for more natural, human-like interaction patterns
- Azure AI Studio makes agent development highly transparent and adaptable for enterprise or prototyping use
📸 Screenshot
💻 Code Example
import os
from dotenv import load_dotenv
from typing import Any
from pathlib import Path

# Add references
from azure.identity import DefaultAzureCredential
from azure.ai.agents import AgentsClient
from azure.ai.agents.models import FilePurpose, CodeInterpreterTool, ListSortOrder, MessageRole

def main():
    # Clear the console
    os.system('cls' if os.name=='nt' else 'clear')

    # Load environment variables from .env file
    load_dotenv()
    project_endpoint= os.getenv("PROJECT_ENDPOINT")
    model_deployment = os.getenv("MODEL_DEPLOYMENT_NAME")

    # Display the data to be analyzed
    script_dir = Path(__file__).parent  # Get the directory of the script
    file_path = script_dir / 'data.txt'

    with file_path.open('r') as file:
        data = file.read() + "\n"
        print(data)

    # Connect to the Agent client
    agent_client = AgentsClient(
        endpoint=project_endpoint,
        credential=DefaultAzureCredential
            (exclude_environment_credential=True,
            exclude_managed_identity_credential=True)
    )
    with agent_client:

        # Upload the data file and create a CodeInterpreterTool
        file = agent_client.files.upload_and_poll(
            file_path=file_path, purpose=FilePurpose.AGENTS
        )
        print(f"Uploaded {file.filename}")

        code_interpreter = CodeInterpreterTool(file_ids=[file.id])

        # Define an agent that uses the CodeInterpreterTool
        agent = agent_client.create_agent(
            model=model_deployment,
            name="data-agent",
            instructions="You are an AI agent that analyzes the data in the file that has been uploaded. Use Python to calculate statistical metrics as necessary.",
            tools=code_interpreter.definitions,
            tool_resources=code_interpreter.resources,
        )
        print(f"Using agent: {agent.name}")

        # Create a thread for the conversation
        thread = agent_client.threads.create()

        # Loop until the user types 'quit'
        while True:
            # Get input text
            user_prompt = input("Enter a prompt (or type 'quit' to exit): ")
            if user_prompt.lower() == "quit":
                break
            if len(user_prompt) == 0:
                print("Please enter a prompt.")
                continue

            # Send a prompt to the agent
            message = agent_client.messages.create(
                thread_id=thread.id,
                role="user",
                content=user_prompt,
            )

            run = agent_client.runs.create_and_process(thread_id=thread.id, agent_id=agent.id)

            # Check the run status for failures
            if run.status == "failed":
                print(f"Run failed: {run.last_error}")

            # Show the latest response from the agent
            last_msg = agent_client.messages.get_last_message_text_by_role(
                thread_id=thread.id,
                role=MessageRole.AGENT,
            )
            if last_msg:
                print(f"Last Message: {last_msg.text.value}")

        # Get the conversation history
        print("\nConversation Log:\n")
        messages = agent_client.messages.list(thread_id=thread.id, order=ListSortOrder.ASCENDING)
        for message in messages:
            if message.text_messages:
                last_msg = message.text_messages[-1]
                print(f"{message.role}: {last_msg.text.value}\n")

        # Clean up
        agent_client.delete_agent(agent.id)

if __name__ == '__main__':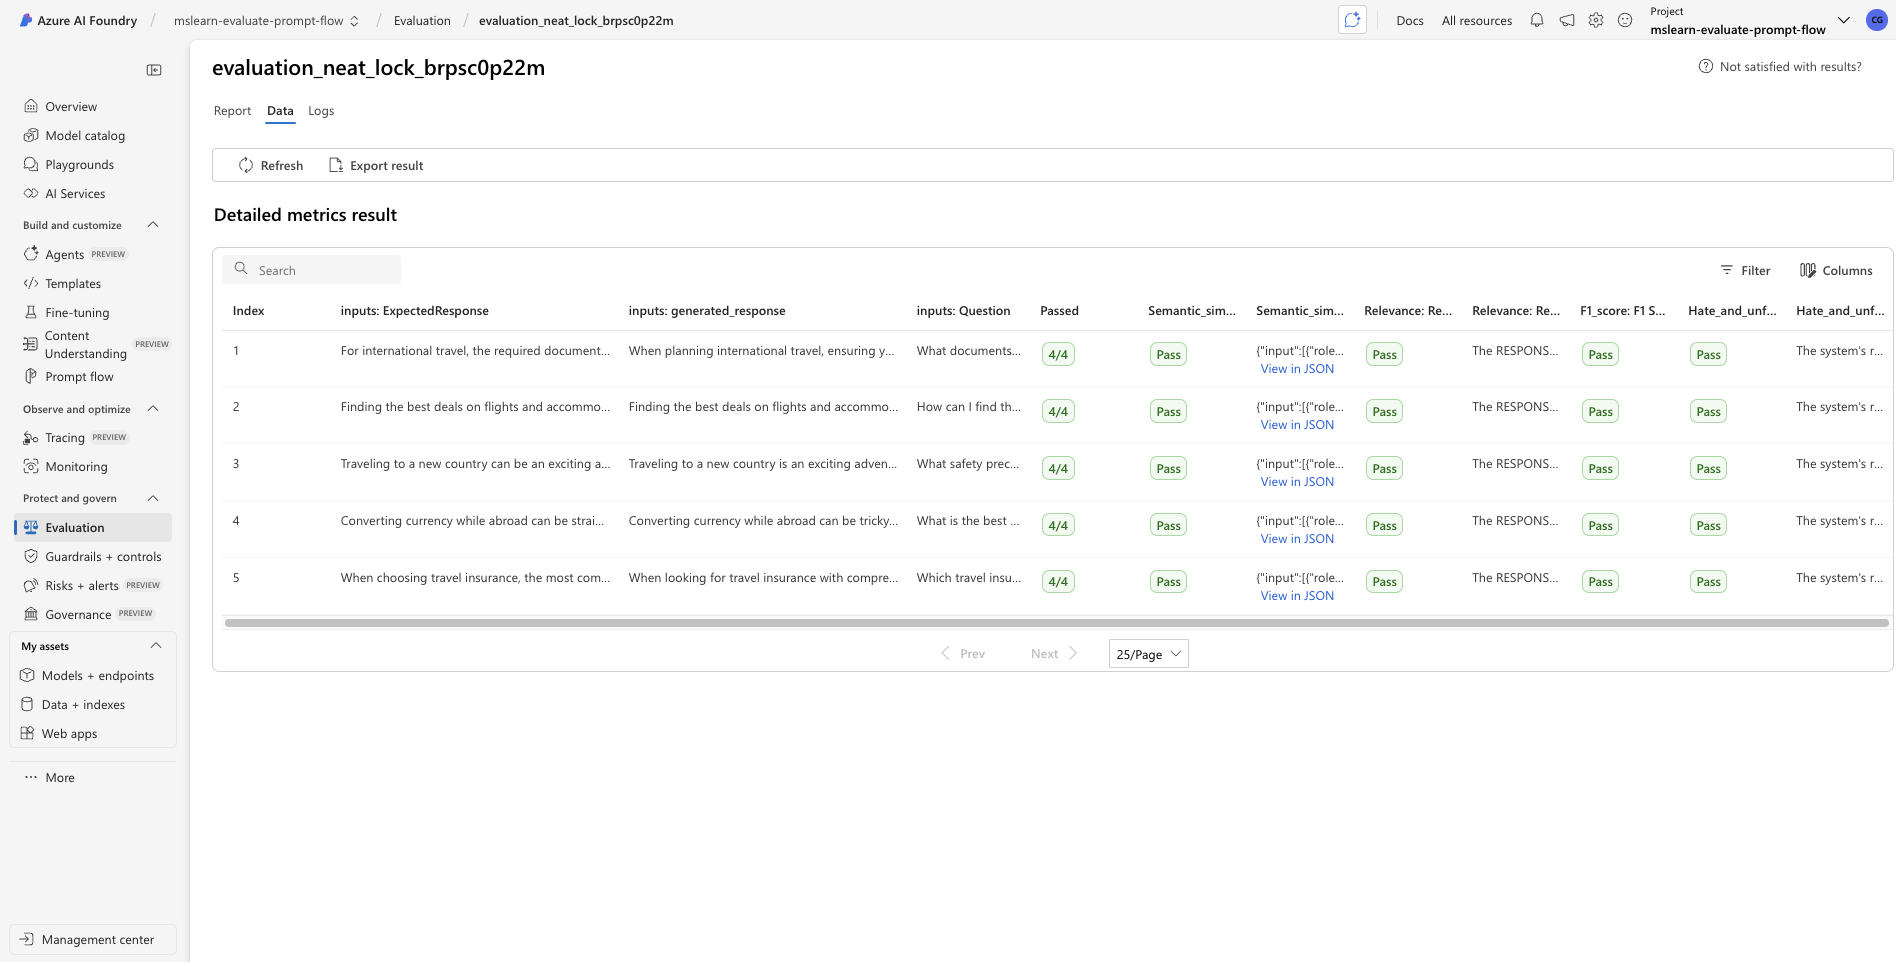
main()Evaluating Prompt Flow with Azure AI Studio
Today, I completed an advanced evaluation exercise using Azure AI Studio's Prompt Flow. This module deepened my understanding of how to systematically assess the quality, fairness, and alignment of generative AI outputs using both automated and human-guided evaluation techniques.
🎯 Goal
Master prompt evaluation workflows using built-in evaluators like model scoring, similarity checks, and fairness assessments in Azure AI Studio.
🛠️ Process
- Prompt Flow Configuration: Set up a multi-step evaluation chain using Azure AI Studio's Prompt Flow to evaluate LLM responses.
- Model Scoring: Applied the Model Scorer to rate response quality on a numerical scale for consistency across tests.
- Likert-Scale Evaluation: Used the Likert evaluator to gather human-like ordinal feedback on relevance and tone.
- Text Similarity: Measured how closely the model's output matched ideal responses using similarity scoring metrics.
- Safety Checks: Ran evaluators for hateful and unfair content, testing AI output for ethical compliance and safety red flags.
⚠️ Roadblock
The main challenge was understanding when to apply each evaluator type appropriately within a multi-step flow. Balancing human-like judgment with objective scoring required thoughtful calibration of expectations and thresholds.
✅ Outcome
- Successfully ran a full suite of prompt evaluations in Azure AI Studio
- Learned how to integrate automated and human-aligned scoring methods for AI outputs
- Built intuition around model behavior, fairness auditing, and performance scoring
- Gained practical experience in designing safe, aligned, and measurable LLM workflows
📌 Key Takeaways
- Evaluation is as critical as prompt design—scoring and safety must be built into the AI lifecycle
- Using diverse evaluators (quantitative and qualitative) provides a fuller picture of model reliability
- Azure AI Studio's built-in tools make it easy to operationalize responsible AI practices
- Practicing with fairness and similarity metrics prepares workflows for enterprise-grade deployment
📸 Screenshot
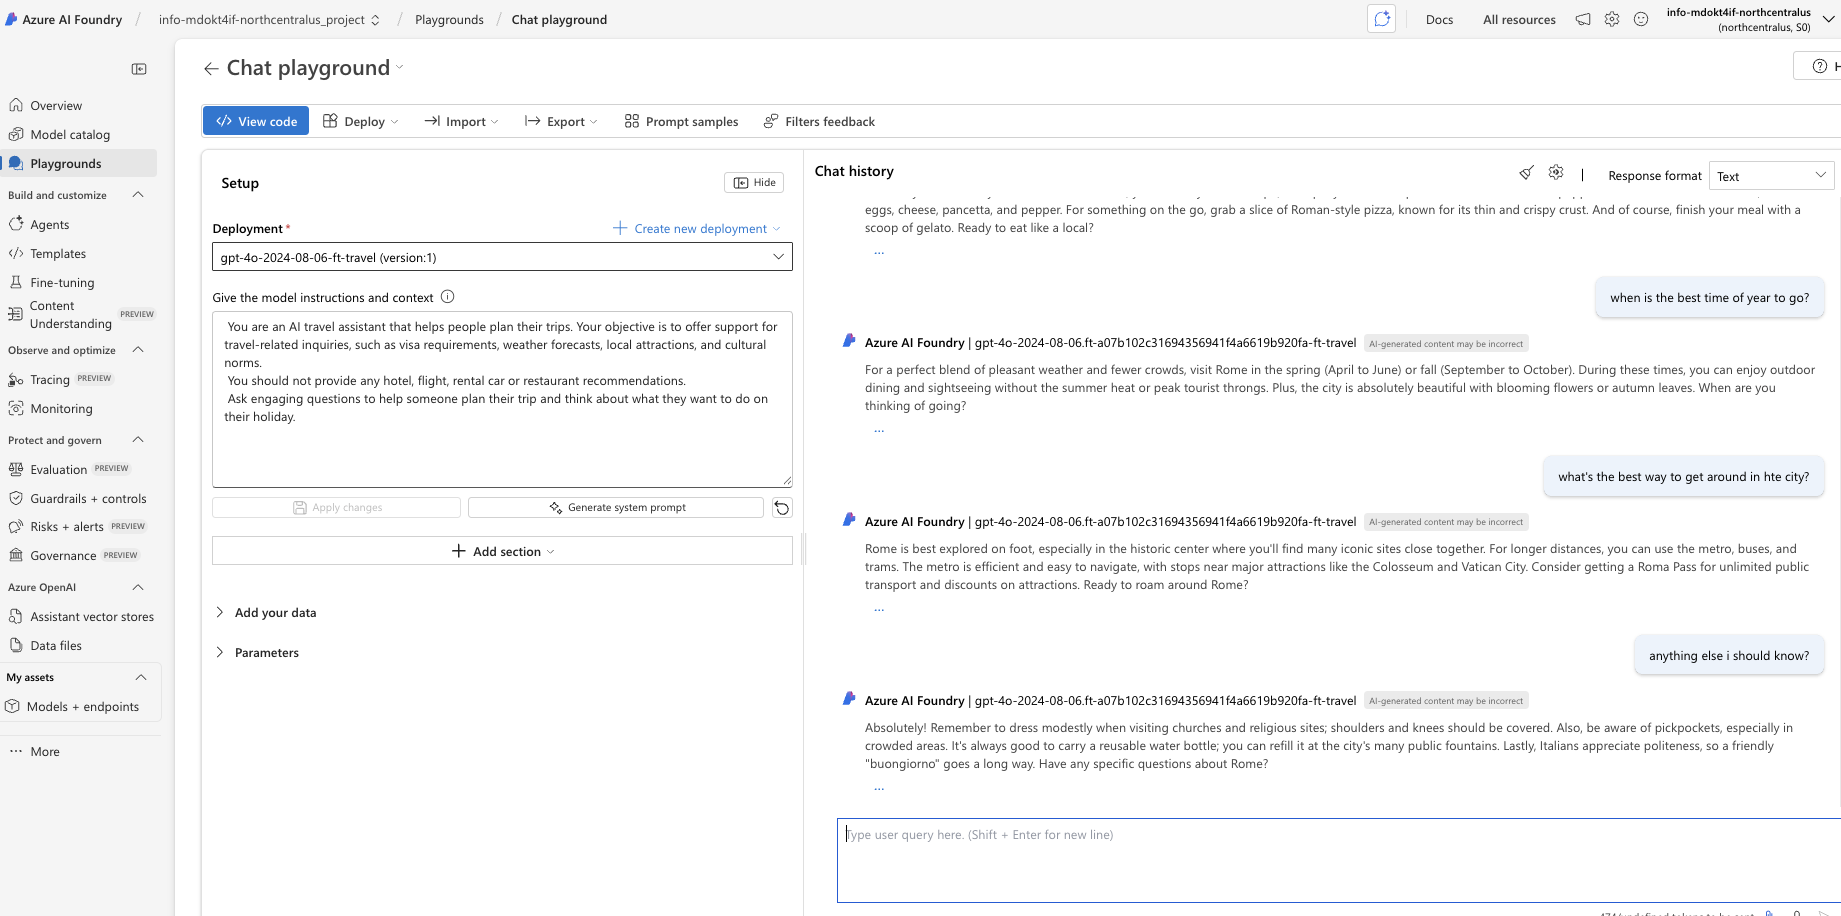
Fine-Tuning GPT-4o on Azure AI Foundry
This week, I completed a fine-tuning exercise using Microsoft Azure's AI Foundry platform. The goal was to customize GPT-4o using my own dataset and compare the behavior of the fine-tuned model to the standard version.
🧪 What I Did
- Used Azure AI Foundry to run the fine-tuning workflow from start to finish.
- Uploaded a training dataset and configured a fine-tuning job targeting OpenAI's GPT-4o model.
- Monitored the job through stages: "queued," "running," "succeeded."
- Deployed the newly fine-tuned model and tested it in comparison with the base GPT-4o.
⏱ Time Breakdown
- Fine-tuning duration: ~60 minutes
- Deployment duration: ~30 minutes
- Total: ~1.5 hours
Observation: This process takes significantly longer than other AI development activities (e.g., prompt engineering or using prebuilt models). GPU queuing and model building are both time-sensitive stages.
🔍 What I Learned
Fine-tuning = behavioral tuning. The process alters how the model responds more than what it knows.
- Broad, verbose, and highly detailed
- Best suited for exploratory or context-rich tasks
- Shorter, more conversational, and more to the point
- More aligned with a "personable assistant" voice
Tradeoff Insight: The outcome isn't always "better"—it's more specialized. Fine-tuning sharpens tone and behavior at the potential cost of completeness or generality.
Error Handling: I encountered a temporary "job queued" delay and a 500 error during deployment, but the system recovered automatically.
💡 Implications for Polibased (briefly)
- Fine-tuning could be used to shape Cato's tone, ensuring it feels grounded and civic-minded.
- Useful for bill summarization models trained on plain-language legislative data.
- Could support future role-based assistants or state-specific versions of Cato.
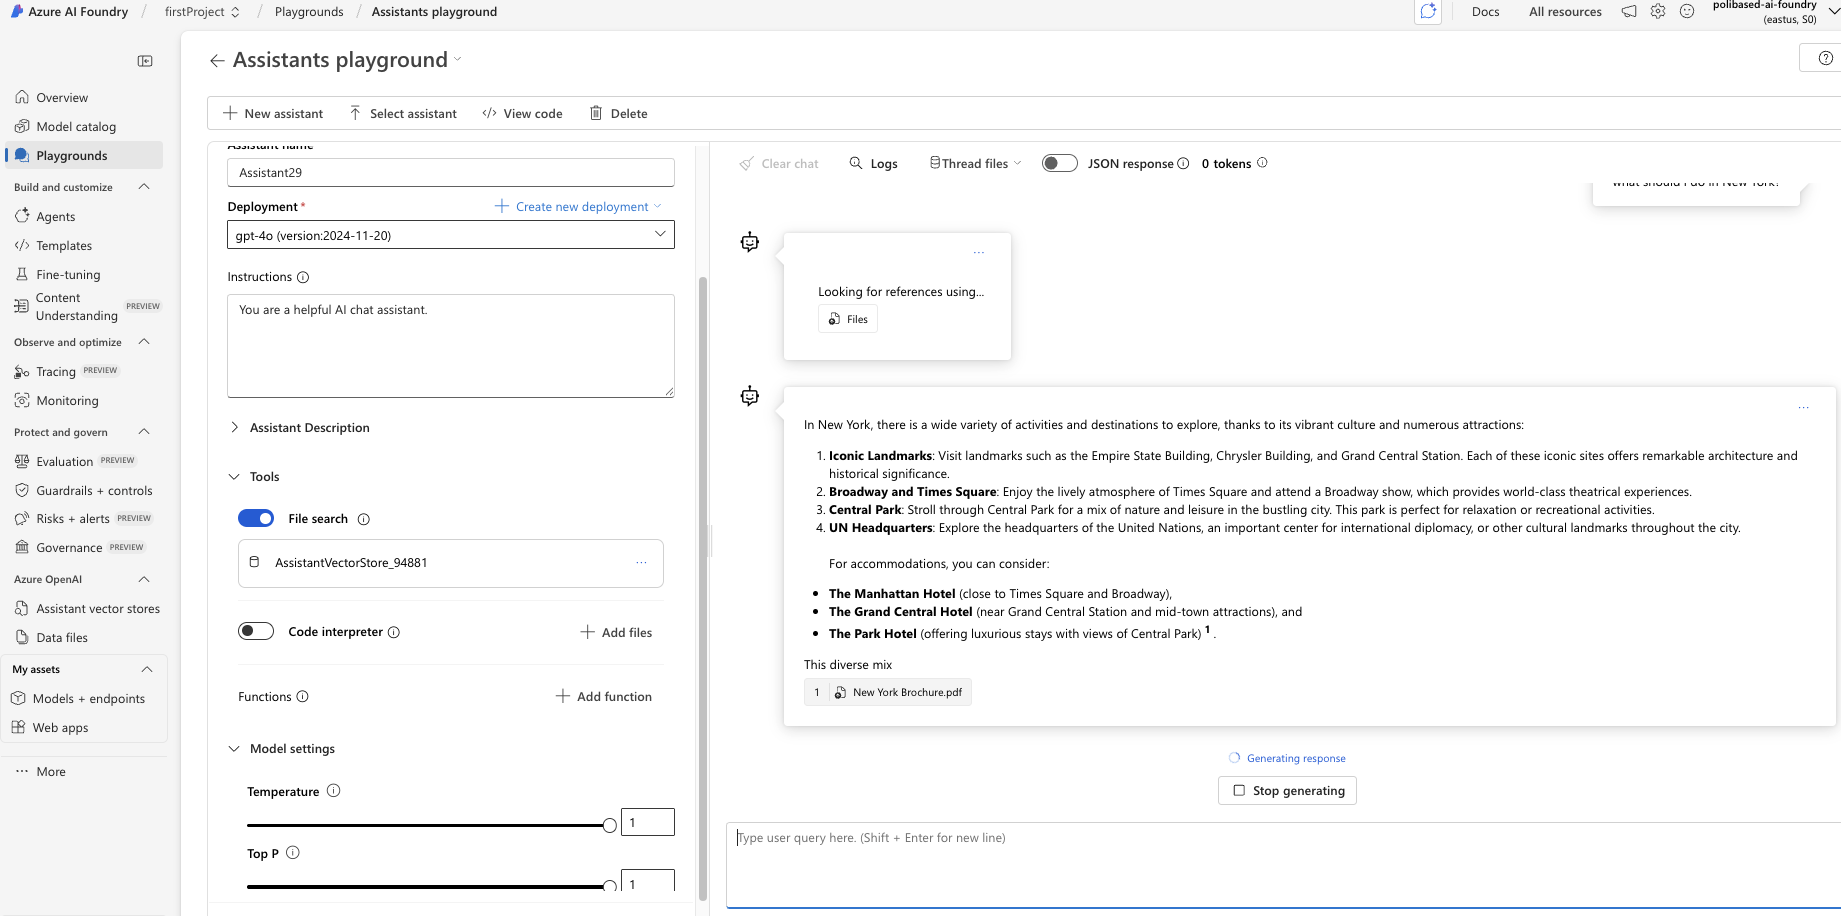
Implemented RAG in Azure Prompt Flow
Retrieval-Augmented Generation (RAG) using Azure AI Studio & Prompt Flow
🎯 Goal
Successfully implemented a Retrieval-Augmented Generation (RAG) pipeline using Azure Prompt Flow, integrating file-based knowledge with LLM-powered responses.
🛠️ Process
- Built a Prompt Flow in Azure AI Studio that supports RAG by connecting a user query to file-based knowledge
- Used the Azure AI Foundry Playground → Assistants as the main interface for testing and validation
- Selected "File Search" as the assistant's tool, and uploaded custom PDFs (e.g. documentation, learning guides)
- Prompt Flow connected to the assistant, enabling RAG queries based on real file content
⚠️ Roadblock
While following the MS Learn "Use your own data" tutorial, I found that the "Data + indexes" tab and flow described in the tutorial were no longer functional. Instead of trying to manually create a vector index via that flow, I followed the updated method using Assistants + File Search.
✅ Outcome
- Confirmed working RAG setup within a Prompt Flow pipeline
- Able to pass user questions into the assistant, retrieve relevant passages from the PDFs, and return LLM-grounded responses
- This provides a flexible architecture for future expansion (e.g. Azure AI Search or data lake integration)
📌 Key Takeaways
- Prompt Flow + Assistant + File Search provides a lightweight, scalable way to prototype RAG without needing manual index management
- Azure documentation is partially outdated — always verify UI changes in the latest Azure AI Studio interface
- Future iterations may involve custom indexing using Azure AI Search for greater control
📸 Screenshots

Streamlining Portfolio Deployment & Documentation
Today, I tackled a full web development cycle, from debugging deployment issues to enhancing project documentation and refining site details. This process reinforced best practices in project management and attention to detail.
🎯 Goal
Successfully resolve deployment failures, create comprehensive project documentation, and finalize site content for a polished portfolio launch.
🛠️ Process
- Project Cleanup & Debugging: Initiated by performing a clean sweep of the project, removing build artifacts (.next) and reinstalling dependencies to ensure a fresh start.
- Component Simplification: Identified and refactored the Learning.tsx component, removing problematic image references and complex modal logic that were contributing to build errors and unnecessary complexity.
- Local Build Verification: Conducted thorough local builds to confirm that all issues were resolved and the application was stable before attempting redeployment.
- Comprehensive Documentation: Drafted a detailed README.md file, covering project features, tech stack, setup instructions, and content structure, to serve as a complete guide for the project.
- Content Refinement: Systematically updated contact information (email address) across Navigation.tsx, Contact.tsx, and README.md for consistency.
- UI Polish: Adjusted the footer layout in app/page.tsx to improve readability and aesthetic appeal, separating build credits from copyright information.
⚠️ Roadblock
The primary challenge was diagnosing the root cause of the deployment failures. Initially, Netlify (Bolt's preferred deployment tool) was not working as expected, leading to troubleshooting efforts. This, combined with issues like outdated image paths and overly complex, unused UI logic within a specific component, required a systematic approach to isolate and resolve. Ultimately, I pivoted to Vercel for successful deployment.
✅ Outcome
- Achieved successful and stable deployment of the portfolio site
- Established a robust and informative README.md for future development and collaboration
- Ensured complete consistency of contact details and a refined user interface
- Gained deeper insight into debugging Next.js build processes and managing project assets
📌 Key Takeaways
- Regular project cleanup and dependency management are crucial for preventing build issues
- Simplifying components and removing unused code can significantly improve stability and maintainability
- Comprehensive documentation is as vital as the code itself for project understanding and future scalability
- Attention to minor details like consistent contact information and footer formatting contributes to a professional final product
Using Generative AI Chat Client in Azure
Intro to Azure AI Foundry SDK (Python)
🎯 Objective
Learn to initialize and run a GenAI project in Python using the Azure AI Foundry SDK, a developer tool for managing AI workflows locally before deploying to Azure AI Studio.
🔁 Step-by-Step Workflow
- Deploy model within Azure AI Foundry - Used gpt-4o model
- Installed Azure AI Foundry SDK using pip
- Initialized a Foundry Project with foundry init
- Explored Project Structure - components/, configs/, data/, outputs/
- Added Components via CLI
- Configured Inference Pipeline
- Ran the Pipeline with Python
🧠 Key Concepts Learned
- How to bootstrap GenAI projects using Python
- Importance of modular design for reusable components
- Local-first dev workflow enables faster iteration and cost savings
- Foundation for scaling to Azure AI Studio deployments
📸 Screenshot
Starting AI-102 Certification
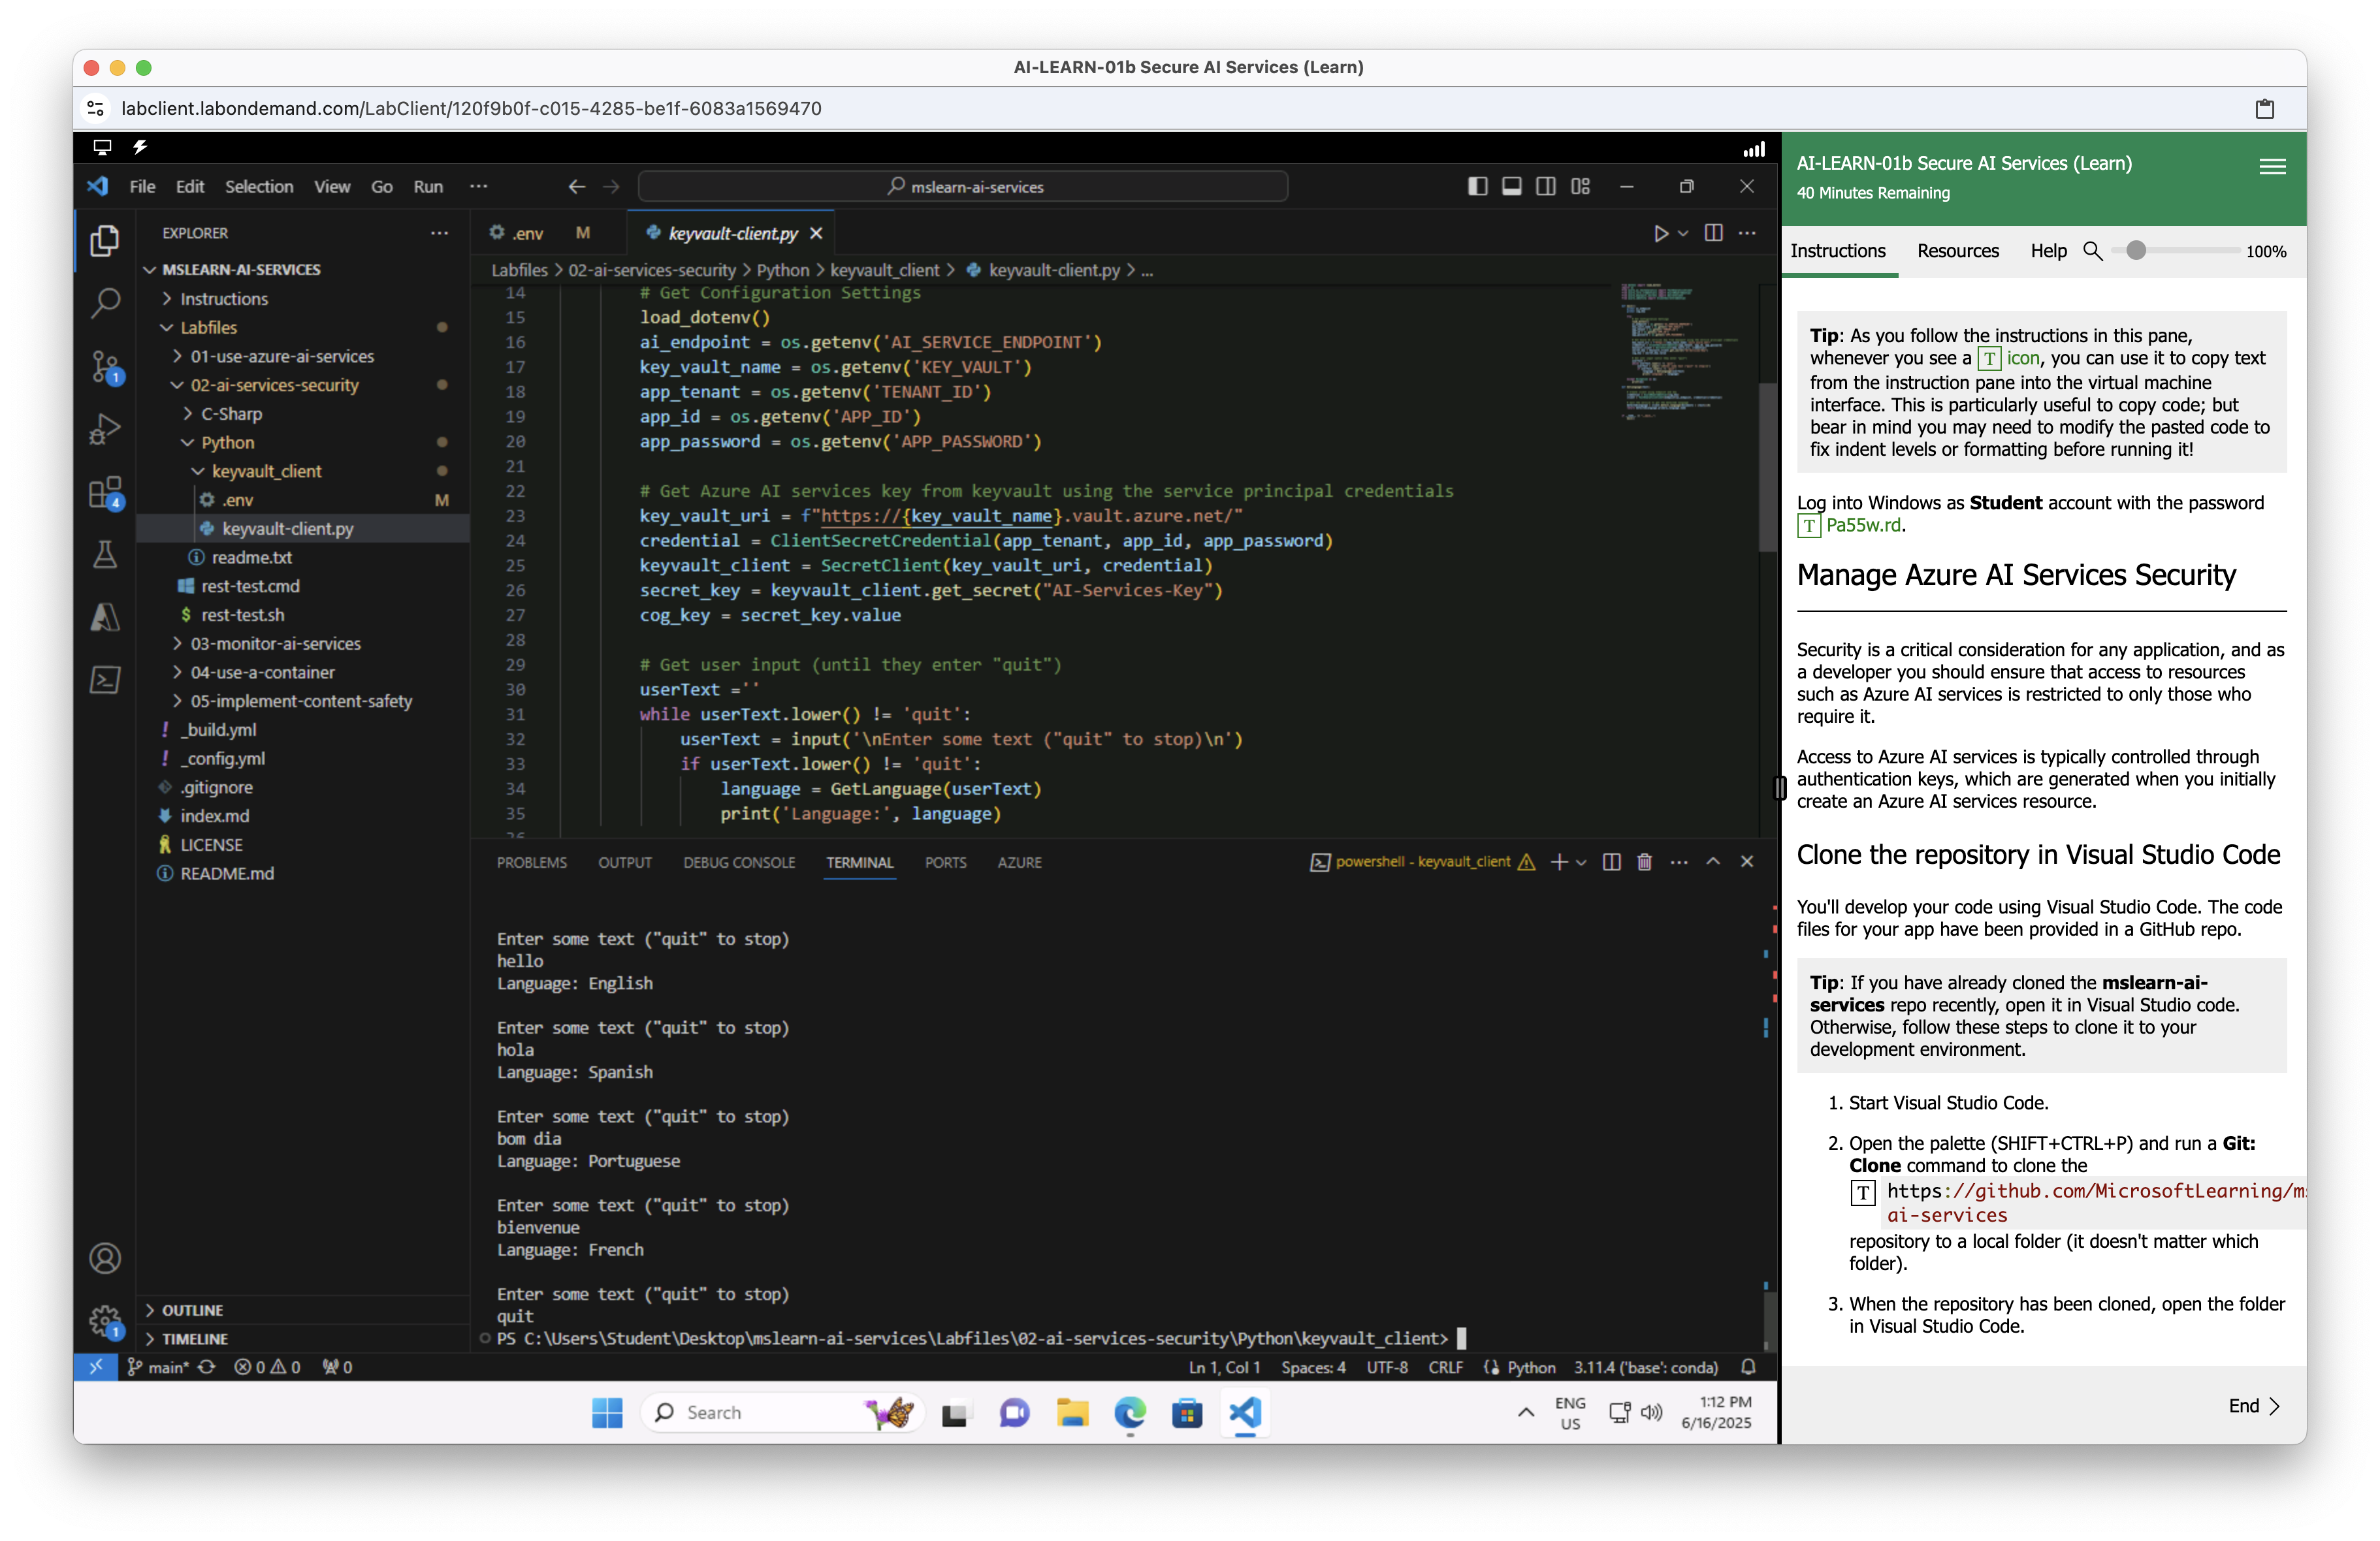
AI-102 Lab — Secure Access to Azure AI Services
🎯 Objective
Learn to securely connect a Python application to Azure AI Services using Azure Key Vault for secret storage, a Service Principal for identity-based access, and Azure SDKs to authenticate and run an AI task.
🔁 Step-by-Step Workflow
- Provisioned Azure AI Services Resource
- Stored Key in Azure Key Vault
- Created a Service Principal using Azure CLI
- Granted Key Vault Permissions
- Configured Python App with required packages
- Ran the Application - detected language for text prompts
🔐 Key Concepts Learned
- Why not to hardcode keys in source code
- How to use Azure Key Vault to secure secrets
- How a service principal acts as a secure app identity
- How to use the Azure Identity SDK in Python
- How to call Azure AI services securely from a Python app
📸 Screenshot
Milestone Unlocked: AI-900 Certified!
I'm excited to share that I've officially passed the Microsoft Azure AI Fundamentals (AI-900) certification!
This marks an important step in my transition into the AI and cloud technology space. The certification covered core concepts in:
- Machine learning and AI workloads
- Azure services for computer vision, natural language processing, and responsible AI
- Foundational knowledge of cloud deployment options
Through this process, I strengthened my understanding of how AI can be practically applied — especially within civic data, education, and public sector systems.
ML Task - Binary Classification
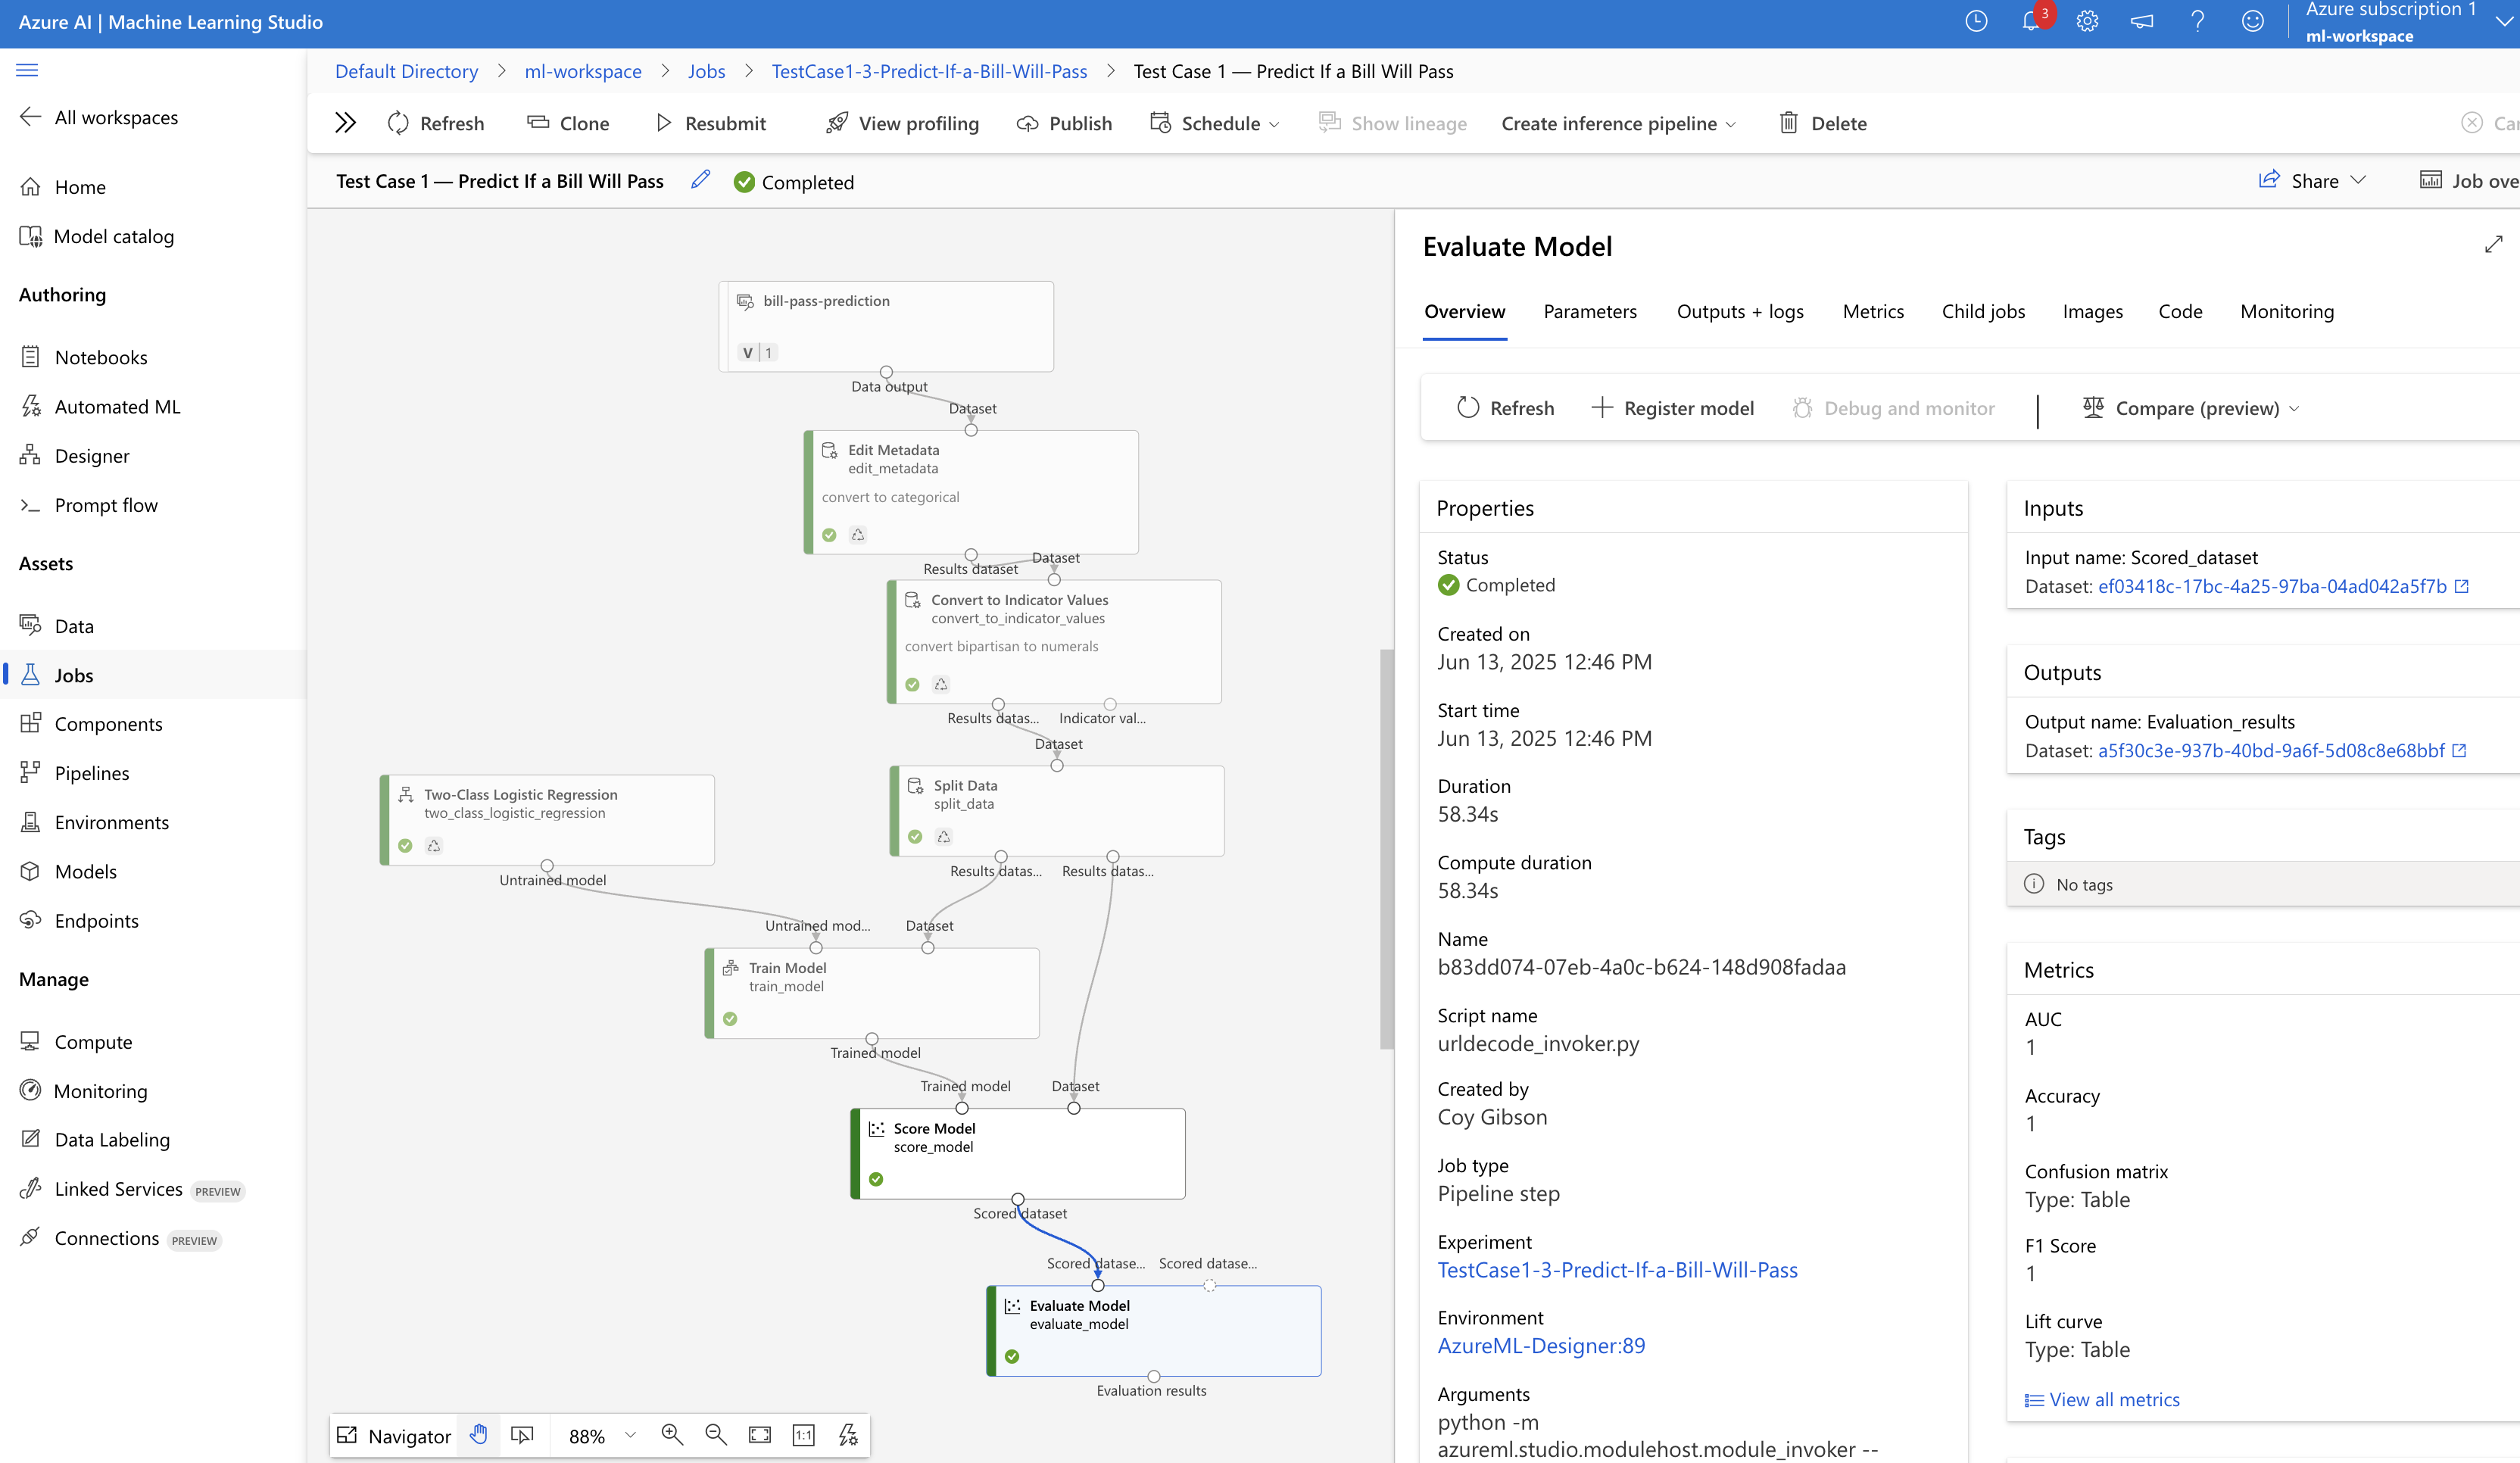
ML Task: Binary classification — Will a bill pass or fail?
Built and trained a two-class logistic regression model in Azure ML Studio Designer using legislative features to predict the likelihood of a bill passing.
📊 Features used (X)
- Chamber (House/Senate)
- Majority_Party (Democrat/Republican)
- Bipartisan (Yes/No)
- Num_Sponsors (Numeric)
📊 Model Results
- Accuracy: 1.00
- AUC: 1.00
- Precision: 1.00
- Recall: 1.00
📸 Screenshots
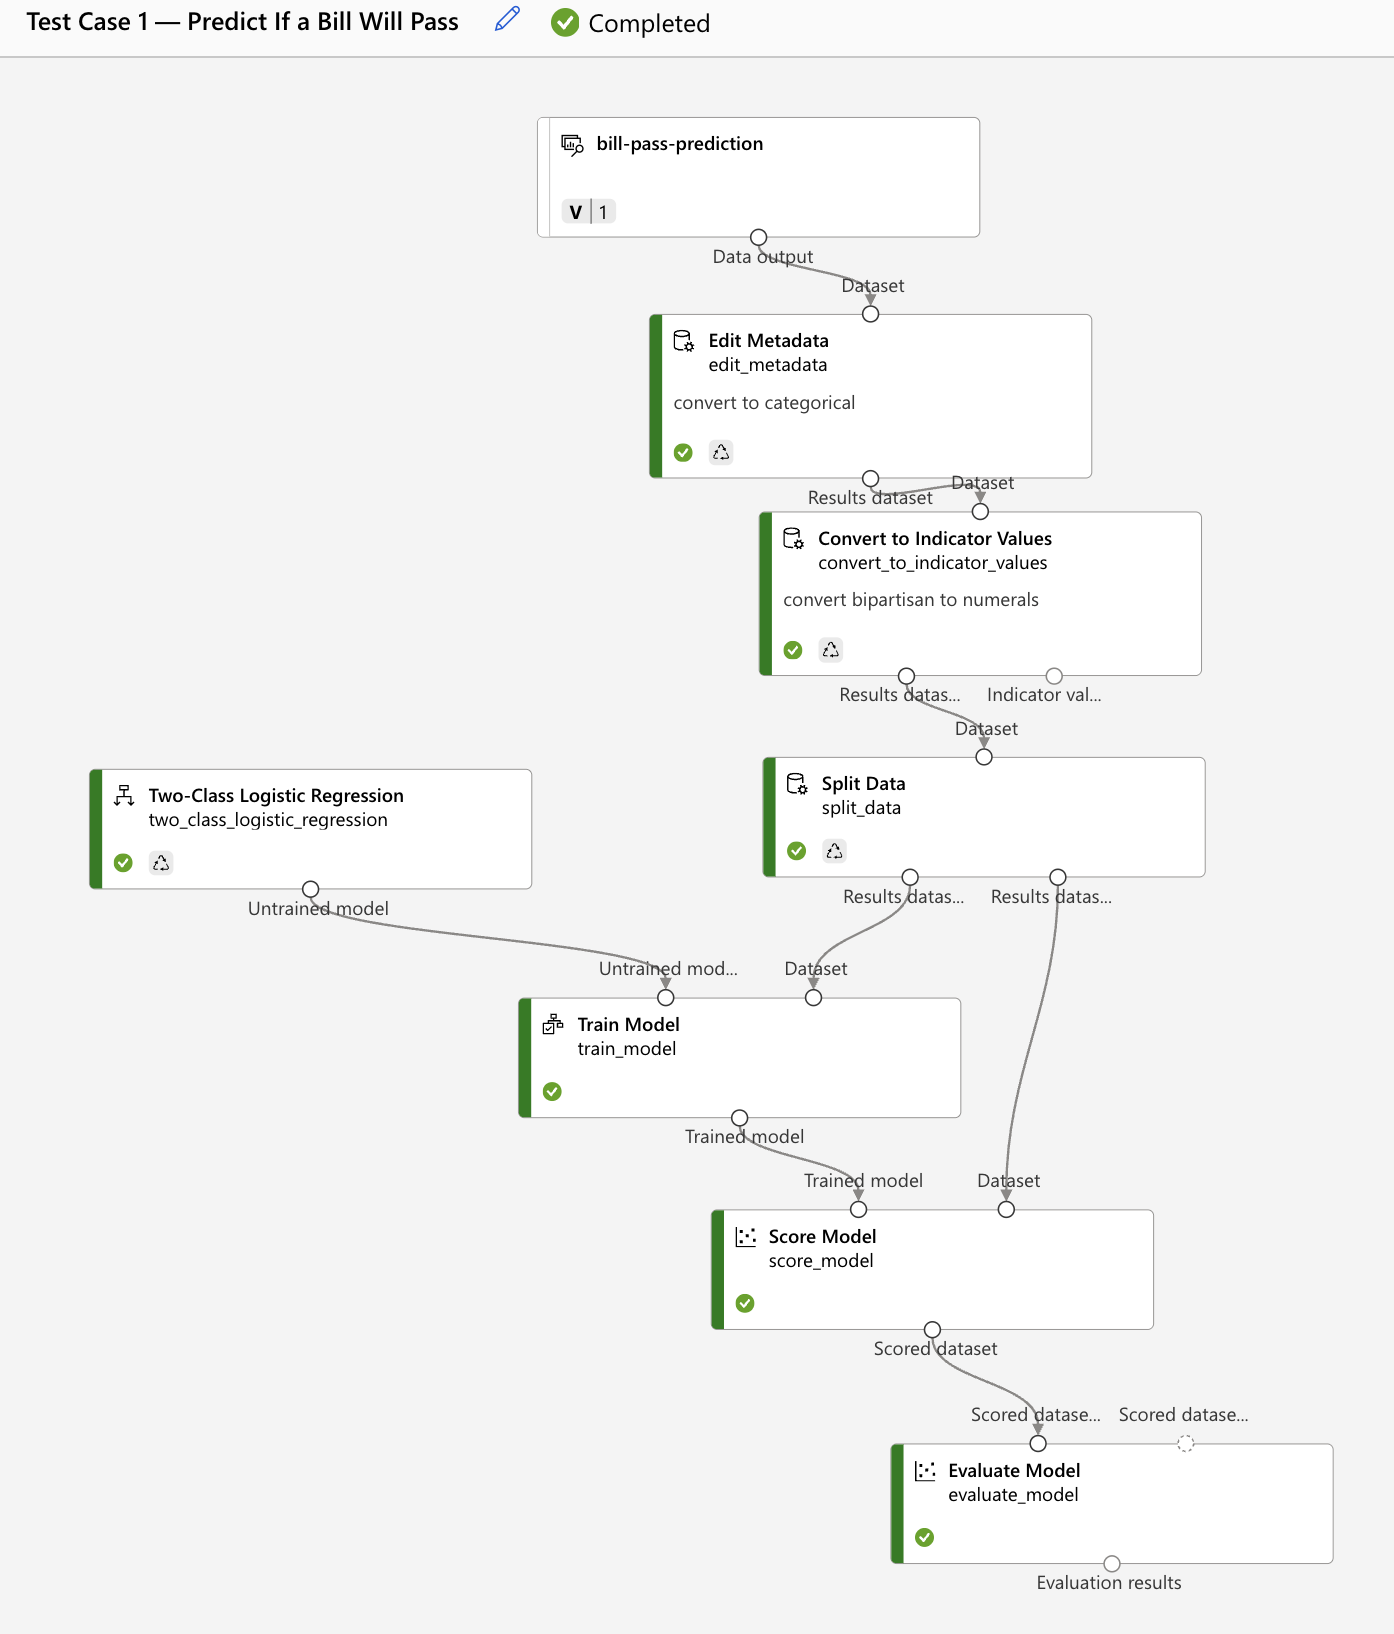
💡 Insight
Bipartisan bills with more than 20 sponsors consistently passed in the dataset. The model achieved perfect accuracy on the test data — a strong result for a clean, synthetic dataset.
Why I Chose Microsoft Azure (for Now)
As I began building Polibased and diving deeper into AI development, I had to pick a cloud platform to learn and build on. While AWS is the market leader with a vast set of tools, I ultimately chose Microsoft Azure as my starting point—primarily because it's easier to learn and quicker to get productive with as a solo builder.
Here's why Azure made sense at this stage:
Gentler Learning Curve
Azure's interface, tutorials, and service documentation felt more beginner-friendly. Tools like Azure AI Studio and Microsoft Learn helped me gain traction quickly without getting overwhelmed by configuration or complexity.
Built-in AI Tools
With native support for OpenAI models, Prompt Flow, and AI Studio, Azure offered a smoother path to prototyping and deploying intelligent applications—perfect for getting Polibased off the ground.
Fast, Low-Friction Setup
Azure let me spin up working environments with fewer moving parts. As a solo developer, I needed fewer distractions and more momentum—and Azure helped deliver that.
Strong Learning Resources
Microsoft's certification paths (AI-900, AI-102) provided clear guidance for upskilling. They've made cloud and AI fundamentals easier to understand and apply, especially for someone transitioning from another career path.
Ecosystem Alignment
Since I was already using VS Code, GitHub, and other Microsoft tools, Azure felt like a natural extension of my workflow.
What about AWS?
I absolutely plan to circle back to AWS in the future. It's a powerful platform with a rich feature set, and I want to become fluent in both environments over time. But for now, Azure has been the right place to start—cleaner ramp-up, faster learning, and less friction getting from idea to execution.
Pursuit of Coherence
Coherence, at its core, is the ability to bring order from chaos by establishing a unified, harmonious whole where all parts connect seamlessly. In ancient times, philosophers like Plato sought this ideal in a "well-ordered Republic," while the Stoics aimed for a life in harmony with the cosmos. This timeless pursuit of meaning and structure is what drives the development of coherent systems today.
A coherent system is more than just a random collection of parts; it's an intelligent structure where every element works together, reducing friction and maximizing impact. Think of the seamless logistics of a modern supply chain, or the elegant flow of data in a well-designed application. My career has been dedicated to this principle, transforming disparate elements into a unified, purposeful whole.
The power of coherence lies not just in its efficiency but in its capacity to clarify complexity. It is not a destination, but a process—a task to be picked up each day in every organization. The challenge is not to build a perfect system once, but to constantly refine, adapt, and bring order to the inevitable chaos of a dynamic world. In a world of overwhelming information and constant noise, a coherent system brings clarity, purpose, and elegance to the most challenging problems.
It's the art of turning chaos not just into order, but into symphony.